Love this? Pin it for later! 📌
Last January, after a particularly decadent December filled with my mother-in-law's famous pecan pie and my neighbor's irresistible cheese platters, I vowed to find a way to balance my love for comforting Mexican flavors with my desire to feel energized and healthy. Traditional tacos were off the table – those corn tortillas and all those carb-heavy toppings were exactly what I was trying to avoid. But giving up tacos entirely? That's not a world I want to live in.
After weeks of experimentation, I finally cracked the code: a freezer-friendly, keto-approved taco meal that tastes like it came straight from your favorite cantina but fuels your body like the healthiest meal prep. The best part? You can make a double (or triple) batch on a Sunday afternoon, freeze individual portions, and have restaurant-quality tacos ready in minutes throughout those busy January weeks when your motivation is running low but your goals are still high.
Why This Recipe Works
- Freezer Hero: Make-ahead magic means you're always 10 minutes away from a healthy meal, even when life gets chaotic
- Keto-Perfect Macros: Each serving packs just 4g net carbs with a satisfying 28g of protein to keep you full for hours
- Authentic Flavor: The secret spice blend delivers that genuine taco truck taste without any added sugars or fillers
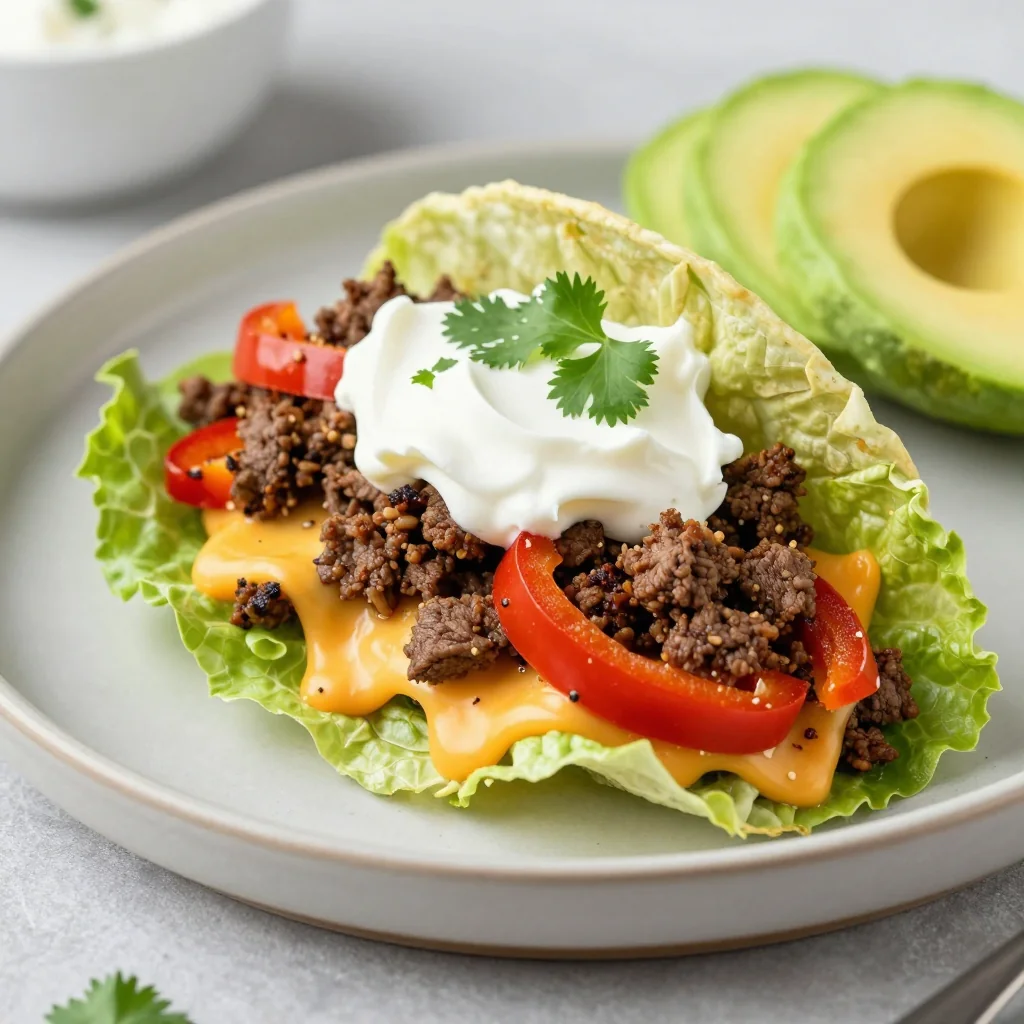
- Family-Friendly Flexibility: Serve it in lettuce wraps for yourself and regular tortillas for the kids – everyone wins
- Budget-Smart: Uses affordable ground beef and pantry spices to create a meal that costs less than $3 per serving
- Meal Prep Champion: One cooking session yields 8 generous servings that freeze beautifully for up to 3 months
- New Year's Resolution Approved: Satisfies those comfort food cravings while keeping you firmly on track with your health goals
Ingredients You'll Need
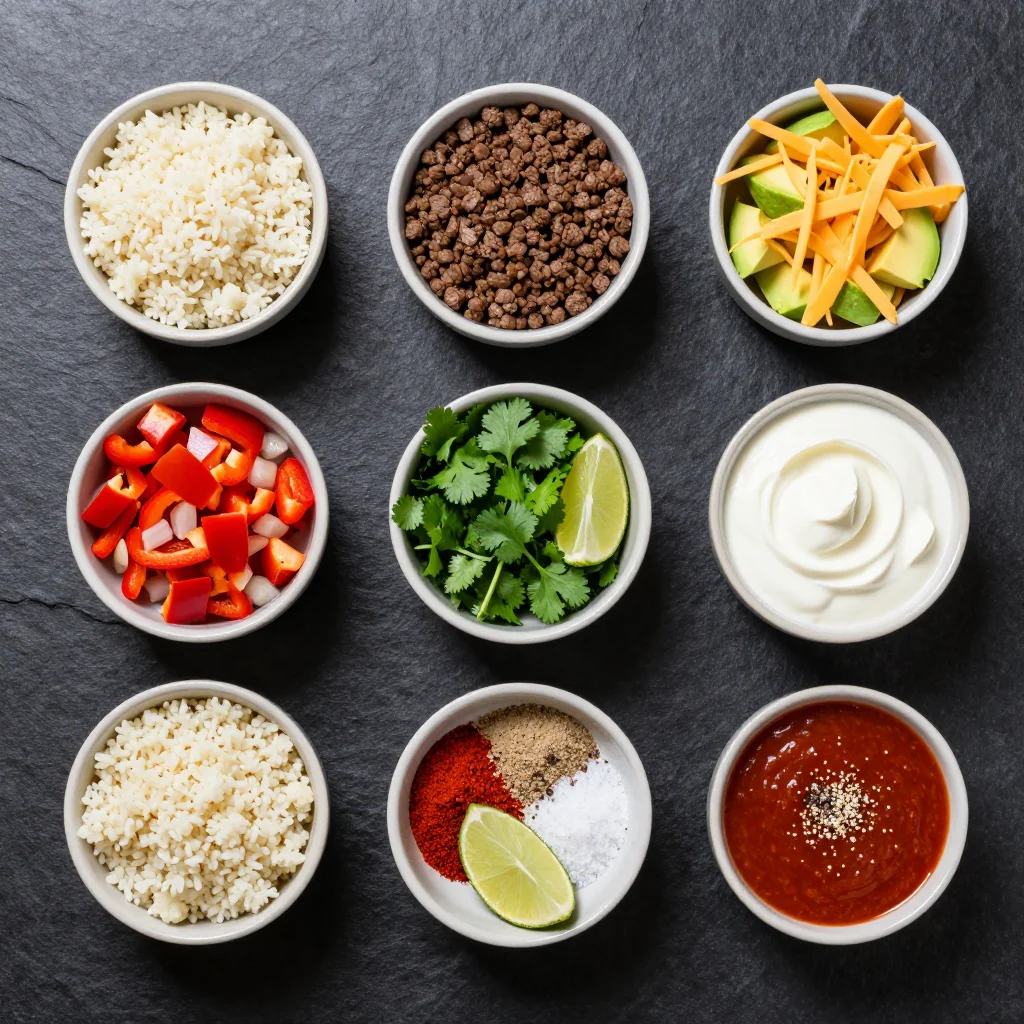
Let's talk ingredients, because the quality of what you put into this meal directly impacts the joy you'll get out of it. I've tested this recipe with everything from grass-fed organic beef to budget-friendly supermarket options, and I'm here to tell you exactly what works best.
Ground Beef (2 lbs): Opt for 80/20 ground beef for the perfect balance of flavor and juiciness. The fat content keeps the meat tender through the freezing and reheating process, while still being keto-friendly. If you're watching calories more strictly, 85/15 works too, but avoid the super-lean 93/7 – your tacos will taste dry and disappointing. I've also made this with ground turkey for a lighter version, though you'll want to add an extra tablespoon of olive oil to compensate for the leanness.
Homemade Taco Seasoning: This is where the magic happens, friends. My blend combines chili powder, cumin, smoked paprika, oregano, garlic powder, onion powder, salt, and a touch of cayenne for heat. The key is using fresh spices – if your cumin has been sitting in the cupboard since last New Year's, it's time for a refresh. Store-bought packets often contain hidden sugars and anti-caking agents that can kick you out of ketosis.
Cauliflower Rice (4 cups): The ultimate keto secret weapon! Frozen cauliflower rice works beautifully here – just thaw and squeeze out excess moisture. It bulks up the meal, adds nutrients, and absorbs all those gorgeous taco flavors. Fresh cauliflower rice works too, but you'll need to sauté it first to remove some moisture.
Bell Peppers & Onions: These aromatics create that authentic fajita-style flavor base. I use a mix of red and green bell peppers for both sweetness and that classic taco taste. Yellow onions work best – they're sweeter than white and caramelize beautifully without added sugar.
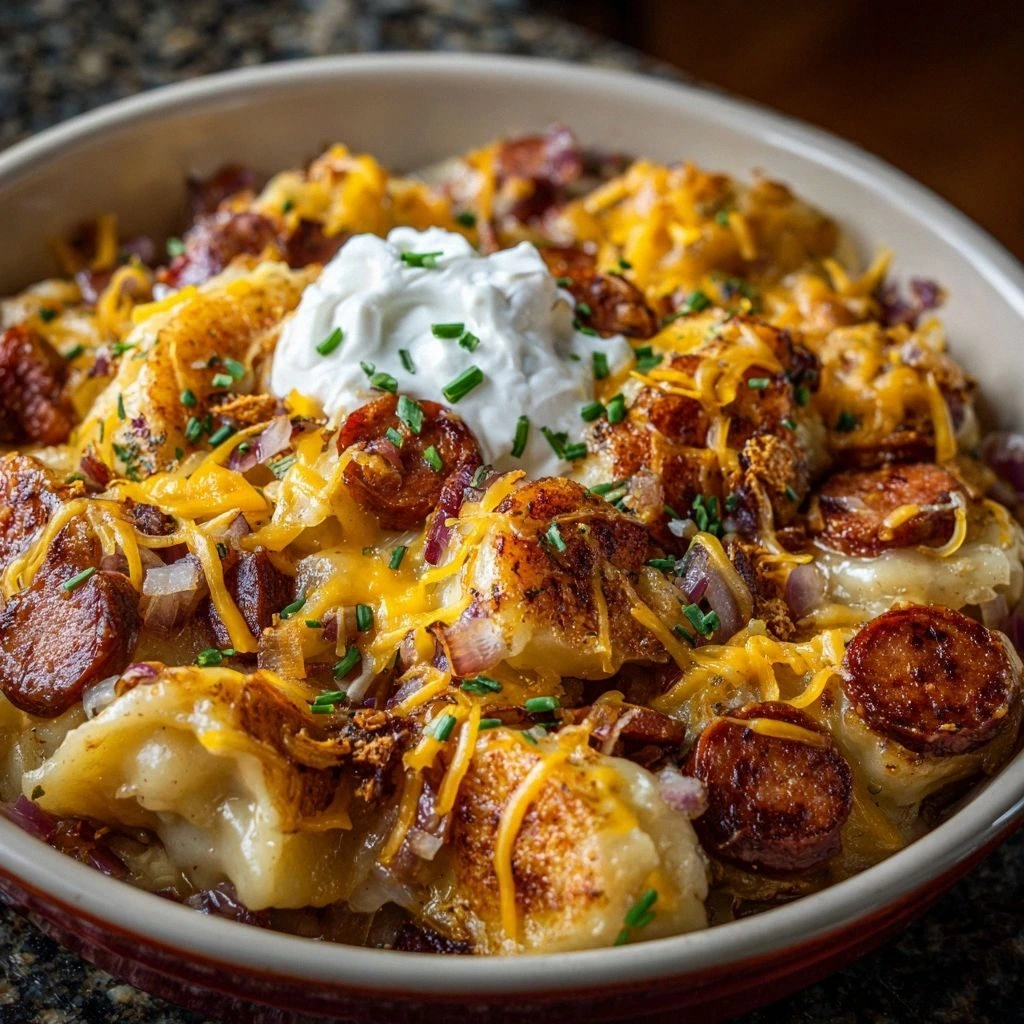
Cheese, Cheese, Cheese: A triple-threat of shredded cheddar, cream cheese, and a touch of queso fresco creates layers of creamy, melty, tangy goodness. Full-fat is the way to go here – this is keto, after all! The cream cheese acts as a binder, keeping everything creamy even after freezing.
Chipotle Peppers in Adobo: Just one pepper, minced finely, adds incredible smoky depth and authentic Mexican flavor. Don't skip this! Freeze the remaining peppers in an ice cube tray for future recipes.
How to Make Keto Taco Freezer Meal for New Year's Healthy Eats
Brown the Beef with Aromatics
Heat a large Dutch oven or heavy-bottomed pot over medium-high heat. Add the ground beef, breaking it up with a wooden spoon. Before the beef is fully browned, add diced onions and minced garlic. This timing allows the onions to release their natural sweetness into the meat. Cook until beef is no longer pink and onions are translucent, about 8-10 minutes. Drain excess fat, but leave about 2 tablespoons – this carries flavor!
Create the Flavor Base
Push the beef mixture to the sides of the pot, creating a well in the center. Add tomato paste and let it caramelize for 2 minutes – this deepens the umami flavor. Add minced chipotle pepper, all the dried spices, and a splash of beef broth. Stir constantly for 1 minute until fragrant. Your kitchen should smell like a Mexican spice market at this point!
Build the Vegetable Layer
Add diced bell peppers and cauliflower rice to the pot. Stir well to combine, ensuring the vegetables are coated with the spice mixture. Add beef broth, diced tomatoes, and tomato sauce. Bring to a gentle simmer, then reduce heat to low. Cover and cook for 15 minutes, stirring occasionally. The cauliflower should be tender but not mushy.
Add the Creamy Elements
Reduce heat to low and stir in cream cheese, a little at a time, until fully incorporated. Add half the shredded cheddar and all the queso fresco. Stir until melted and creamy. This creates a luxurious texture that freezes and reheats beautifully. Taste and adjust seasoning – you might want more salt, a squeeze of lime, or extra cayenne for heat.
Cool and Portion
Remove from heat and let the mixture cool for 20 minutes. This prevents condensation in your freezer containers. While cooling, prepare your freezer containers – I recommend 2-cup portions for individual servings or 4-cup portions for family meals. Label your containers with the recipe name, date, and reheating instructions.
Freeze for Future You
Divide the cooled taco mixture among your containers, leaving 1/2 inch headspace for expansion. Press plastic wrap directly onto the surface to prevent freezer burn. Freeze flat for efficient storage. Properly frozen, these meals will maintain peak quality for 3 months – though they're so delicious, I doubt they'll last that long!
Reheat Like a Pro
For best results, thaw overnight in the refrigerator. Reheat in a skillet over medium heat, stirring occasionally, until heated through. Add a splash of broth if needed to loosen the sauce. From frozen, microwave on 50% power for 6-8 minutes, stirring every 2 minutes. Or bake covered at 350°F for 25-30 minutes from frozen.
Serve and Customize
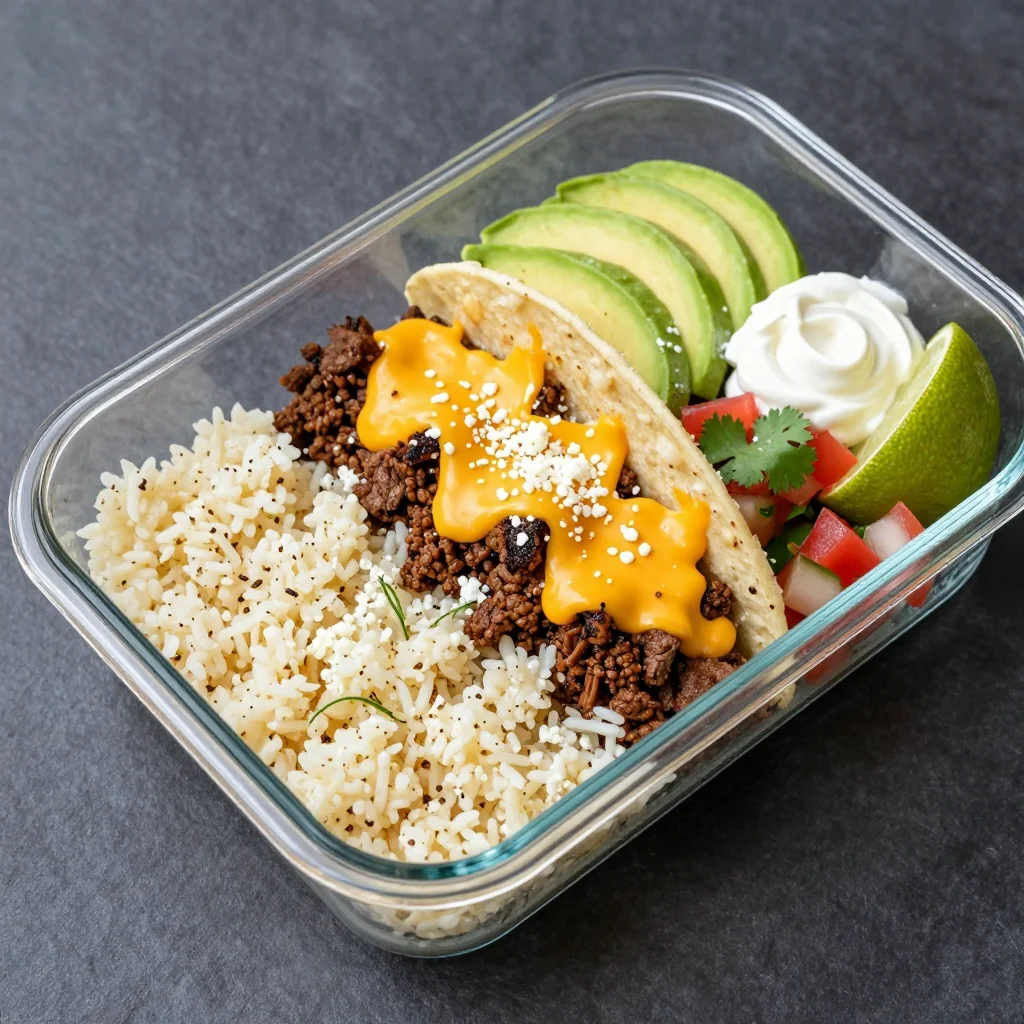
Serve your keto taco mixture in crisp romaine lettuce leaves, over cauliflower rice, or stuff into bell pepper halves. Top with remaining shredded cheese, diced avocado, sour cream, fresh cilantro, and a squeeze of lime. For those not following keto, it's equally delicious in traditional tortillas or over regular rice.
Expert Tips
Freezer Success Secret
Cool your taco mixture completely before freezing to prevent ice crystals from forming. Spread it in a thin layer on a baking sheet for 30 minutes, then transfer to containers. This keeps the texture perfect!
Spice Level Control
Start with half the chipotle pepper if you're sensitive to heat. You can always add more, but you can't take it out! Serve with cooling sour cream to balance any unexpected fire.
Budget Stretcher
Ground turkey or chicken works great and costs less than beef. Add 2 tablespoons of olive oil and an extra pinch of smoked paprika to mimic beef's richness.
Time-Saver Trick
Double the spice blend and store half in an airtight jar. Next time you make this recipe, you'll save 5 minutes and have your custom taco seasoning ready to go!
Moisture Magic
If your mixture seems dry after reheating, stir in 2 tablespoons of heavy cream or full-fat coconut milk. It brings back the creamy texture without watering down the flavor.
Kid-Friendly Hack
Omit the chipotle pepper and reduce cayenne to a pinch. Kids love the cheesy beef mixture served in mini tortillas with a side of mild salsa for dipping.
Variations to Try
Green Chile Chicken Version
Swap ground beef for shredded rotisserie chicken, add a can of diced green chiles, and use Monterey Jack cheese instead of cheddar. It's lighter but equally satisfying, with a New Mexican flair.
Vegetarian Keto Option
Replace meat with crumbled firm tofu that's been pressed and sautéed until golden. Add walnuts ground in a food processor for texture. Use vegetable broth and double the spices for extra flavor.
Breakfast Taco Style
Add 6 beaten eggs during the last 5 minutes of cooking, stirring gently to create soft curds. Include breakfast sausage and serve with avocado slices for a hearty morning meal.
Seafood Lover's Dream
Use ground pork as the base, then fold in cooked shrimp during the last 2 minutes. Add Old Bay seasoning and serve in avocado halves for an elegant, low-carb presentation.
Storage Tips
Refrigerator Storage
Cooked taco mixture keeps beautifully in the refrigerator for up to 4 days. Store in an airtight container with a piece of plastic wrap pressed directly onto the surface to prevent drying. Reheat individual portions in the microwave for 60-90 seconds, stirring halfway through.
Freezer Storage
Freeze in portion-sized containers or heavy-duty freezer bags. Remove as much air as possible to prevent freezer burn. Lay bags flat for space-efficient storage. Label with contents, date, and reheating instructions. Use within 3 months for best quality, though they'll remain safe indefinitely at 0°F.
Meal Prep Containers
I love using glass containers with tight-fitting lids for individual servings. They're microwave and oven safe, don't absorb odors, and you can see exactly what's inside. For family portions, aluminum pans work great and can go straight from freezer to oven.
Frequently Asked Questions
Absolutely! Replace the cream cheese with 1/2 cup of full-fat coconut milk and nutritional yeast for cheesiness. Use dairy-free shredded cheese alternatives, though I find they don't melt as smoothly. The flavor will be slightly different but still delicious.
This recipe was designed specifically for meal prep! It makes 8 generous servings that freeze beautifully. I prep a batch every other Sunday and have healthy lunches ready for two weeks. The flavors actually improve after a day or two as the spices meld together.
For a keto-friendly meal, serve with a side of guacamole and fresh salsa. A crisp green salad with lime vinaigrette complements the rich taco flavors perfectly. For non-keto family members, add Mexican rice and refried beans on the side.
Yes! This recipe doubles beautifully – you'll need a very large pot or Dutch oven. The cooking time remains the same, just use a wider pan for better evaporation. I always double it and freeze half for busy weeks. You'll need 2-3 extra large freezer containers or multiple smaller ones.
The taco mixture should be steaming hot throughout with an internal temperature of 165°F. Stir well during reheating to ensure even heating. If using a microwave, let it stand for 2 minutes after heating – the temperature will continue to rise slightly, ensuring food safety.
Ground turkey works well but needs extra fat for flavor and texture. Use 93/7 turkey and add 2 tablespoons of olive oil or butter when browning. You might also want to increase the spices by 25% since turkey has a milder flavor than beef.
Keto Taco Freezer Meal for New Year's Healthy Eats
Ingredients
Instructions
- Brown the beef: In a large pot, cook ground beef with onions and garlic until beef is no longer pink. Drain excess fat.
- Build flavor: Add tomato paste and chipotle pepper, cooking for 2 minutes. Stir in all spices and cook 1 minute more.
- Add vegetables: Mix in bell peppers, cauliflower rice, diced tomatoes, and beef broth. Simmer covered for 15 minutes.
- Make it creamy: Reduce heat and stir in cream cheese until melted. Add 1 cup cheddar and all queso fresco.
- Cool and freeze: Let mixture cool completely, then portion into freezer containers. Freeze up to 3 months.
- Reheat and serve: Thaw overnight in refrigerator. Reheat in skillet until hot, adding broth if needed. Serve in lettuce wraps with remaining cheese.
Recipe Notes
For best texture, thaw completely before reheating. Add a splash of heavy cream when reheating for extra richness. This recipe is naturally gluten-free and easily made dairy-free with coconut milk and nutritional yeast.