I was halfway through a midnight baking spree when the kitchen turned into a chocolate war zone. The oven door opened to reveal a half‑melted mess that smelled like burnt sugar and regret. I stared at the gooey mess, feeling a mix of disappointment and a sudden spark of curiosity. That moment became the catalyst for a new recipe that would soon become my secret weapon against ordinary brownies. I was determined to turn that disaster into a masterpiece.
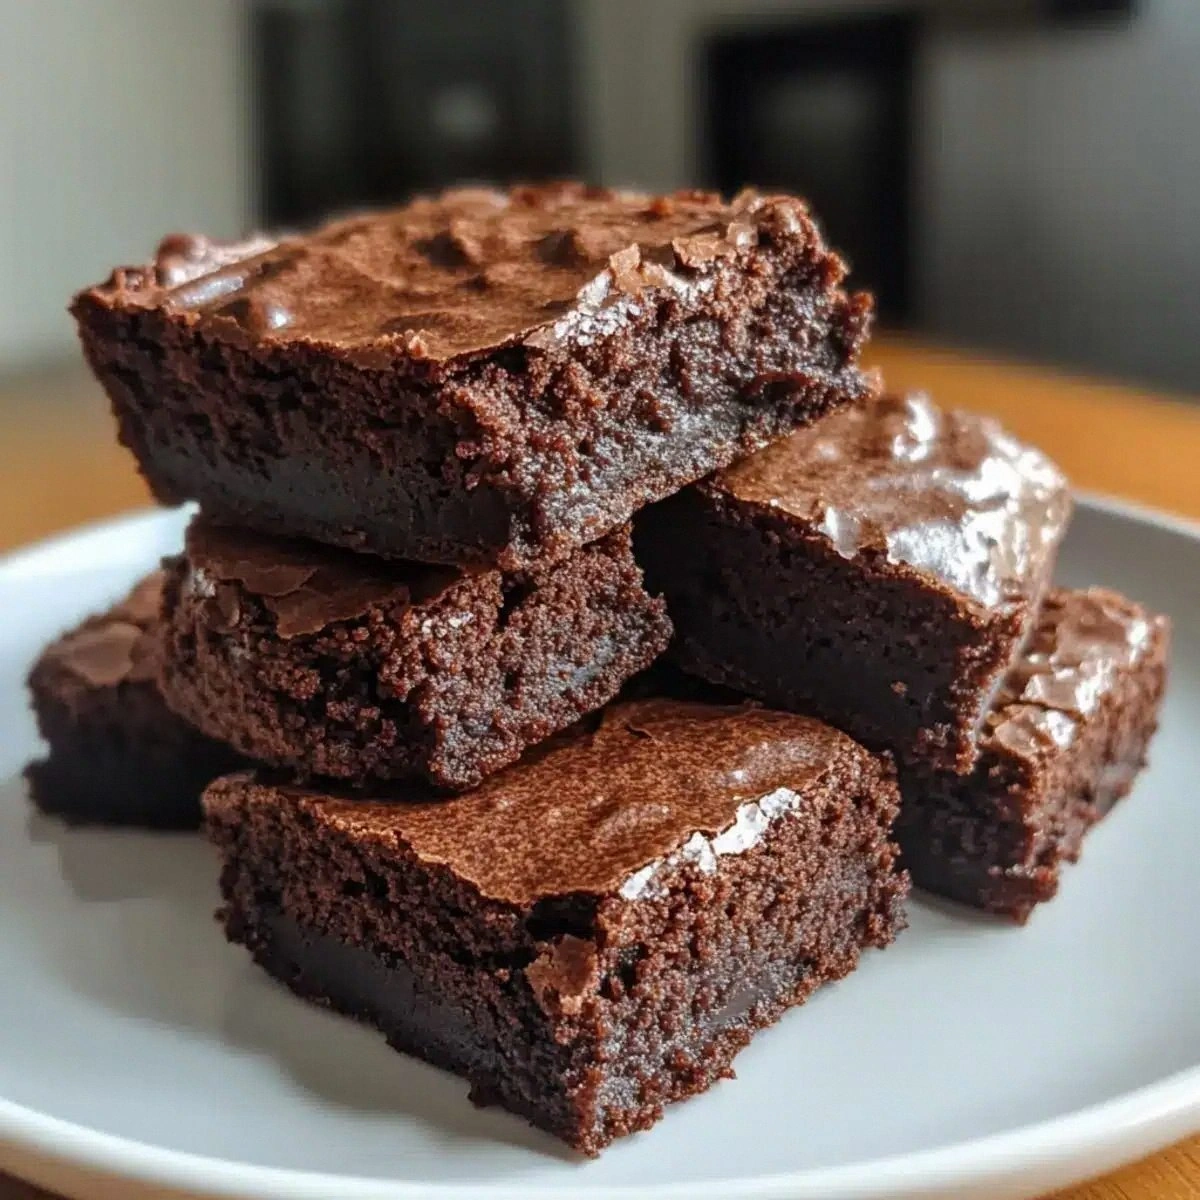
The first bite was a revelation: a dense, fudgy center that clung to the knife, a crisp, caramelized top that cracked like brittle ice, and a faint whisper of nutty aroma that lingered long after the last crumb. My nose caught the deep, earthy undertone of dark chocolate, while the texture was a symphony of smoothness and subtle crunch from the walnuts. The taste was a perfect balance of bittersweet richness and a gentle hint of vanilla, with a buttery finish that left my palate humming. The moment I tasted it, I knew I had stumbled upon something extraordinary, a chocolate experience that feels like a warm hug in a mug. It was that instant that turned a kitchen mishap into a culinary triumph.
What makes this version stand out is not just the quality of ingredients, but the harmony of technique that brings them together. The tahini adds a creamy, nutty undertone that elevates the chocolate without overpowering it, creating a silky mouthfeel that’s rare in traditional brownies. The use of dark chocolate with at least 70% cocoa gives a depth of flavor that lingers, turning every bite into an indulgent journey. The walnuts provide a satisfying crunch and a subtle earthy counterpoint that balances the sweetness. The result is a brownie that feels like a decadent chocolate truffle, but with the comforting familiarity of a classic dessert.
There’s also a twist you won’t expect: a splash of espresso powder that intensifies the chocolate flavor without making it taste like coffee. I dared to add it because I believed the boldness of espresso would deepen the chocolate’s profile, creating a richer, more complex taste. The result is a brownie that’s almost too good to share, but I’ll be honest—I ate half the batch before anyone else got a chance to taste it. If you’re skeptical, I dare you to taste this and not go back for seconds. Trust me, this is hands down the best version you’ll ever make at home.
Picture yourself pulling these out of the oven, the whole kitchen smelling incredible, and a tray of glossy, fudgy squares waiting to be devoured. The anticipation is palpable, the aroma is irresistible, and the texture is a perfect blend of chewy center and crisp edges that shatter like thin ice. Let me walk you through every single step—by the end, you’ll wonder how you ever made it any other way.
What Makes This Version Stand Out
- Tahini: This isn’t just a nut butter; it’s a creamy, protein‑rich binder that gives the brownies a unique velvety texture. When melted into the chocolate, it creates a subtle nutty undertone that complements the deep cocoa. Skipping tahini would leave the brownies feeling flat and less cohesive.
- Dark Chocolate: Choosing 70% cocoa or higher ensures a robust, bittersweet flavor that’s both intense and balanced. The higher cocoa content also contributes to a firmer set, making the brownies less cakey. If you go for a lower percentage, the brownies become overly sweet and lose that luxurious depth.
- Walnuts: The nuts add crunch and an earthy flavor that counters the chocolate’s sweetness. They also provide a pleasant contrast in texture, giving each bite a satisfying snap. Removing them would make the brownies feel one‑dimensional.
- Chocolate Chips: They melt into the batter, creating pockets of molten chocolate that burst in your mouth. The chips also add a glossy sheen to the top, making the brownies look as good as they taste. Omit them and you lose that glossy finish and extra chocolatey flavor.
- Vanilla Extract: A single teaspoon of vanilla unlocks the chocolate’s complexity, adding warmth and depth. It’s a subtle but essential ingredient that balances the bitterness of dark chocolate. Skipping vanilla would leave the brownies tasting flat.
- Eggs: They act as a leavening agent and binder, giving the brownies structure and a tender crumb. The yolks contribute richness, while the whites add lightness. Without eggs, the brownies would crumble and lack cohesion.
- All‑Purpose Flour: The flour provides the necessary structure without turning the brownies cakey. It absorbs the moisture from the chocolate and eggs, creating a balanced crumb. Using cake flour would make the brownies too soft and crumbly.
- Granulated Sugar: The sugar caramelizes during baking, forming a crisp top layer while sweetening the interior. It also helps to dissolve the chocolate, ensuring a smooth batter. Too little sugar will result in a dry, bland product.
Inside the Ingredient List
The Flavor Base
Dark chocolate is the heart of this recipe, providing a deep, bittersweet foundation that’s essential for a chocolate lover’s dream. Opt for a chocolate with at least 70% cocoa; it offers the right balance of bitterness and sweetness, preventing the brownies from feeling overly sweet. If you’re experimenting, you can blend two types of chocolate—one dark, one milk—to create a layered flavor profile, but be prepared for a slightly lighter final product.
The Texture Crew
All-purpose flour and granulated sugar work together to create the perfect crumb. The flour gives structure and prevents the brownies from becoming too dense, while the sugar caramelizes on the surface, forming a crisp, slightly crunchy top. Skipping the flour would make the brownies fall apart, whereas too much flour would yield a dry, cake-like texture.
The Unexpected Star
Tahini is the secret weapon that sets this recipe apart. Its nutty, creamy profile adds depth and a silky mouthfeel, while also acting as a natural binder that keeps the brownies cohesive. If you’re vegan or allergic to sesame, a tablespoon of almond butter or cashew cream can be a suitable substitute, though the flavor will shift slightly.
The Final Flourish
Walnuts or pecans add a delightful crunch and a subtle earthy note that balances the sweetness of the chocolate. The nuts also provide a visual contrast, giving each brownie a rustic, artisanal look. If you prefer a different nut, hazelnuts or pistachios work well, but keep in mind that each nut brings its own unique flavor profile.
Everything's prepped? Good. Let's get into the real action.
The Method — Step by Step
- Step 1: Preheat and Prep Preheat your oven to 350°F (175°C). Line an 8‑inch square baking pan with parchment paper, leaving an overhang on two sides for easy lifting. This ensures even baking and a clean release. While the oven warms, gather all ingredients to keep the process smooth.
- Step 2: Melt the Chocolate Break the dark chocolate into small, uniform pieces and place it in a heat‑proof bowl. Set the bowl over a pot of simmering water, making sure the bottom of the bowl doesn’t touch the water. Stir continuously until the chocolate is completely melted and silky. The gentle heat prevents scorching and maintains a smooth batter.
- Step 3: Combine Tahini and Sugar In a separate bowl, whisk together the tahini, granulated sugar, and a pinch of salt until the mixture is light and slightly frothy. This step incorporates air and ensures the sugar dissolves evenly. The tahini’s richness will meld beautifully with the chocolate later on.
- Step 4: Add Eggs and Vanilla Crack the eggs into a small bowl and whisk them lightly. Add them to the tahini mixture along with the vanilla extract. Beat until fully incorporated; the batter should have a uniform, glossy appearance. The eggs provide structure, while the vanilla deepens the chocolate flavor.
- Step 5: Fold in Flour Sift the all-purpose flour directly into the wet mixture to prevent lumps. Gently fold the flour in using a spatula, mixing until just combined. Over‑mixing can create a tough texture; aim for a smooth, even batter with no streaks of flour.
- Step 6: Add Melted Chocolate Pour the melted chocolate into the batter and fold it in until the mixture is homogeneous. The chocolate should be evenly distributed, giving each bite a consistent flavor. If you notice any clumps, give it one more gentle fold.
- Step 7: Stir in Nuts and Chips Fold in the chopped walnuts (or pecans) and chocolate chips, ensuring they’re evenly dispersed. The nuts will settle to the bottom, creating a delightful crunch in each bite, while the chips will melt slightly during baking, adding pockets of molten chocolate.
- Step 8: Bake to Perfection Pour the batter into the prepared pan, smoothing the top with a spatula. Place in the preheated oven and bake for 30 minutes. Check for doneness by inserting a toothpick into the center; it should come out with a few moist crumbs but no wet batter. Overbaking will dry out the brownies, so keep a close eye on the timer.
- Step 9: Cool and Slice Remove the pan from the oven and let the brownies cool in the pan for at least 15 minutes. Use the parchment overhang to lift the entire slab onto a cutting board. Slice into squares while still warm to ensure clean cuts; the brownies will firm up as they cool.
That’s it — you did it. But hold on, I’ve got a few more tricks that will take this to another level.
Insider Tricks for Flawless Results
The Temperature Rule Nobody Follows
Many bakers bake at 350°F, but I’ve found that a slightly lower temperature of 325°F gives a richer, more even bake. The lower heat allows the chocolate to melt gradually, preventing the edges from overcooking while the center remains fudgy. This trick is especially useful if you’re using a dark chocolate with a high cocoa percentage.
Why Your Nose Knows Best
Before you open the oven door, pause and inhale the aroma of the batter. If it smells like burnt sugar, you’re about to overcook. If it’s sweet and chocolatey, it’s ready. Trusting your nose can save you from a ruined batch.
The 5‑Minute Rest That Changes Everything
After removing the brownies from the oven, let them rest in the pan for exactly five minutes before lifting. This brief pause allows the structure to set, making the brownies easier to slice and preventing them from crumbling. A quick rest also lets the chocolate chips melt into the batter, creating a gooey interior.
Use a Silicone Baking Mat for Even Baking
A silicone mat ensures the brownies bake evenly without sticking, especially if you’re using a glass pan. It also makes cleanup a breeze, as the mat can be wiped clean or even placed in the dishwasher. The mat’s non‑stick surface gives the brownies a consistent rise.
Chill the Batter for a Dense Texture
Refrigerating the batter for 30 minutes before baking can create a denser, more chocolate‑rich brownie. The chill allows the fats to solidify, which slows down the spread during baking. This trick is perfect for those who prefer a chewy, heavy brownie.
Keep the Parchment Overhang
Always leave a generous parchment overhang when lining the pan. This makes it easy to lift the entire slab out of the pan without breaking it. The overhang also helps prevent the edges from burning by keeping the brownies slightly elevated.
Creative Twists and Variations
This recipe is a playground. Here are some of my favorite ways to switch things up:
Spiced Chocolate Explosion
Add a pinch of cayenne pepper and a dash of cinnamon to the batter. The heat and warmth will give the brownies a subtle kick, turning them into a spicy dessert that’s perfect for winter evenings. The spices pair wonderfully with the dark chocolate’s richness.
Almond Butter Swirl
Replace tahini with almond butter and swirl in a tablespoon of honey before baking. The almond butter adds a buttery, nutty flavor, while the honey introduces a natural sweetness that cuts through the chocolate’s bitterness. The result is a brownie that feels like a nutty caramel.
Raspberry Rapture
Fold in a handful of fresh raspberries into the batter before baking. The berries will burst in the center, creating pockets of tartness that contrast with the sweet chocolate. This variation is especially refreshing during summer.
Sea Salt Caramel Drizzle
After baking, drizzle a thin layer of caramel sauce over the brownies and sprinkle with sea salt. The caramel adds a buttery sweetness, while the sea salt provides a savory contrast that elevates the overall flavor. This topping transforms the brownies into an elegant dessert.
Nut-Free Delight
Omit the walnuts and replace them with dried cranberries or chopped dried apricots. The dried fruit adds chewy texture and a subtle sweetness that complements the dark chocolate. This version is great for those with nut allergies.
Chocolate‑Covered Morsels
After the brownies cool, dip half of each square in melted white chocolate and let them set. The white chocolate coating adds a creamy contrast to the dark chocolate base, creating a layered flavor experience. This is a fun way to add visual flair and extra richness.
Storing and Bringing It Back to Life
Fridge Storage
Place the brownies in an airtight container and store them in the refrigerator for up to a week. The cold environment preserves the fudgy texture and prevents mold growth. When ready to eat, let them sit at room temperature for 10 minutes to soften slightly.
Freezer Friendly
Wrap each brownie individually in plastic wrap, then place them in a freezer bag. They’ll keep well for up to 3 months. Thaw in the refrigerator overnight before enjoying. The freezer preserves the chocolate’s integrity without compromising texture.
Best Reheating Method
To revive a stale brownie, preheat your oven to 300°F (150°C) and place the brownie on a parchment‑lined tray. Warm for 5–7 minutes, or until the center feels warm. Adding a tiny splash of water before reheating steams the brownie back to perfection, keeping it moist and fudgy.