Picture this: I’m standing in a kitchen that smells like burnt sugar and melted butter, the countertop a battlefield of flour‑dust and a single, stubborn cookie that refuses to rise. I’ve tried every cookie recipe I’ve ever seen—some are flaky, some are chewy, some are a sad, flat lump—but none have ever managed to hit that sweet spot where the edges crack like a perfect sunrise and the center remains a molten, buttery heart. That day, a friend dared me to make something that would make even the most seasoned baker swoon. I laughed, grabbed my mixing bowl, and set the timer for the ultimate cookie challenge.
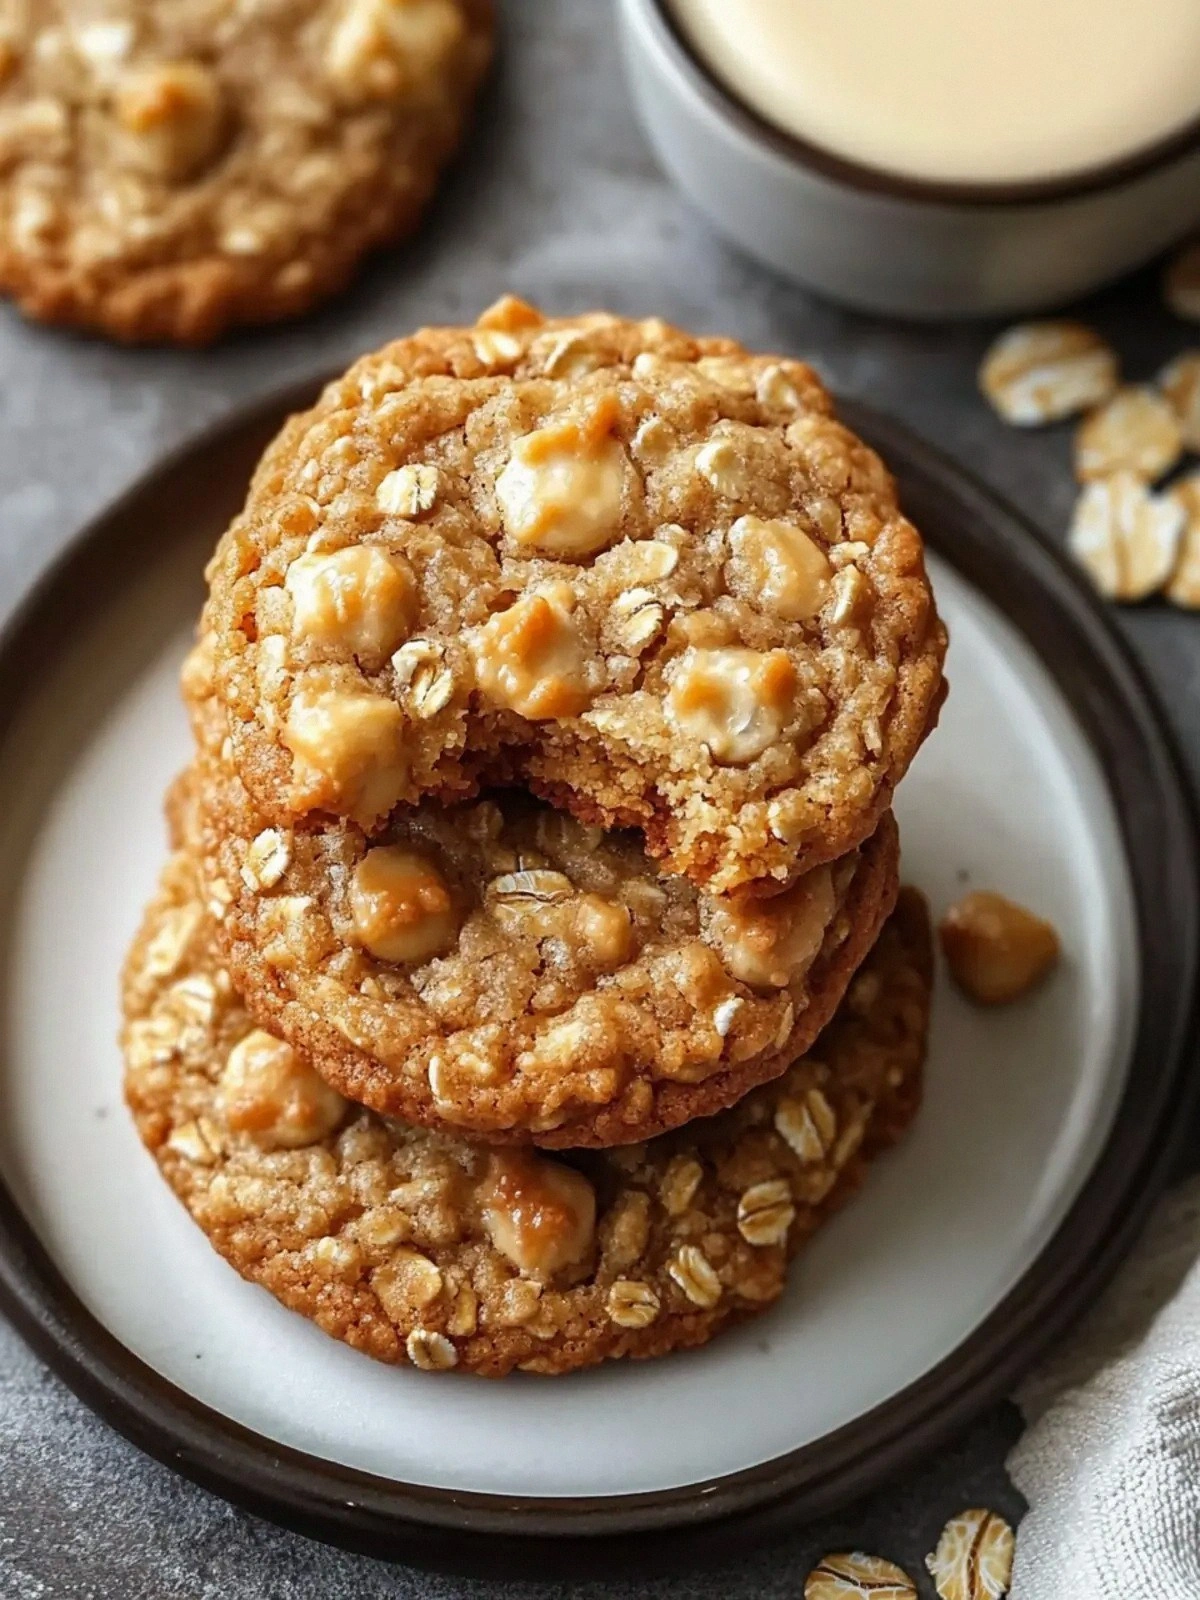
The moment the dough hit the pan, the air filled with the caramelized scent of brown sugar and the subtle aroma of vanilla. I could hear the gentle sizzle, a sound that promised a quick, satisfying crunch. As I watched the edges lift and the cookies spread like a golden horizon, I knew I’d stumbled on something special. The texture is a paradox: a crisp, crackly top that yields to a chewy, oaty interior, all wrapped in a buttery, cinnamon‑nutmeg hug that lingers on the tongue. I dared you to taste this and not go back for seconds, and you’ll find yourself reaching for the next cookie before the first has even cooled.
What makes this version of oatmeal Scotchies truly stand out is that it balances the humble ingredients in a way that feels both indulgent and comforting. The secret lies in the meticulous layering of flavors—light brown sugar’s deep molasses bite, the subtle sharpness of nutmeg, and the warm, sweet hug of butterscotch chips that melt just enough to create pockets of gooeyness. The dough is intentionally dense enough to hold the chips without becoming soggy, yet light enough to bake evenly. It’s the kind of cookie that can be a snack, a dessert, or a comforting breakfast treat, and it’s hands down the best version you’ll ever make at home.
I’ll be honest—before I tried this recipe, my cookie game was a series of flat disappointments. But when I pulled this batch out of the oven, the whole kitchen smelled incredible, and the first bite was a revelation of buttery caramel, a hint of spice, and a satisfying crunch that echoed through the room. Picture yourself pulling this out of the oven, the whole kitchen smelling incredible, the cookies cooling on a rack while you anticipate that first bite. Let me walk you through every single step—by the end, you’ll wonder how you ever made it any other way.
What Makes This Version Stand Out
- Flavor Depth: The combination of light brown sugar and a pinch of ground nutmeg creates a caramelized, earthy sweetness that sets this cookie apart from ordinary oatmeal treats.
- Texture Mastery: The dough’s unique ratio of butter to flour yields a cookie that’s crisp on the edges but chewy in the center, a balance that feels almost impossible to achieve.
- Ingredient Quality: Using old‑fashioned whole rolled oats and real butterscotch chips ensures each bite delivers authentic, wholesome flavor.
- Ease of Prep: The method requires minimal equipment—just a mixer and a baking sheet—making it perfect for novice bakers or a last‑minute dessert.
- Make‑Ahead Potential: Once baked, these cookies keep their texture for a week in an airtight container, making them ideal for potlucks or holiday gift baskets.
- Visual Appeal: The golden brown tops with visible chips and a slightly domed shape make them Instagram‑ready, even without a fancy photo shoot.
Inside the Ingredient List
The Flavor Base
At the heart of this cookie are the sugars and the vanilla. Light brown sugar provides a deep molasses note that caramelizes beautifully, while a dash of granulated sugar sharpens the sweetness without overpowering the other flavors. The tablespoon of vanilla extract ties everything together, adding a subtle floral aroma that lifts the cookie’s overall profile. If you skip the vanilla, the cookie will taste flat and less complex, so keep it in the mix.
The Texture Crew
The rolled oats are the backbone of the cookie, giving it that signature chew and a hearty, wholesome feel. They absorb moisture during baking, creating pockets of soft center that contrast with the crisp edges. The all‑purpose flour binds the dough, but too much flour will make the cookie tough, so the 3/4 cup measured precisely is key. For those who love a denser cookie, you can double the oats, but watch the flour ratio to keep it from drying out.
The Unexpected Star
Butterscotch chips are the secret weapon that turns an ordinary oatmeal cookie into a decadent treat. They melt slightly during baking, creating a gooey center that’s both sweet and buttery. If you’re vegan, you can replace them with vegan chocolate chips or caramel chunks, but the flavor profile will shift. A pinch of salt is essential; it balances the sweetness and enhances every other flavor in the dough.
The Final Flourish
Spices like cinnamon and nutmeg are not just decorative—they add warmth and depth. Cinnamon offers a sweet, woody aroma, while nutmeg provides a subtle peppery edge that cuts through the butter’s richness. The baking soda, though a small amount, is crucial for leavening; it reacts with the acids in the brown sugar to lift the dough slightly, giving the cookie a gentle rise. If you omit it, the cookies will be flat and dense.
Everything's prepped? Good. Let's get into the real action.
The Method — Step by Step
- Preheat your oven to 350°F (175°C) and line two baking sheets with parchment paper. The parchment prevents sticking and makes cleanup a breeze. I swear, if you skip this step, you’ll end up with cookies that cling to the pan like stubborn glue. Keep the oven rack in the middle to ensure even heat distribution.
- In a large mixing bowl, cream the softened butter with the light brown sugar until light and fluffy. Use a stand mixer or a hand mixer on medium speed; this introduces air and creates a lighter dough. If you’re mixing by hand, make sure the butter is at room temperature so it blends smoothly. The dough should look like a pale, airy mixture.
- Beat in the egg, vanilla extract, and granulated sugar until fully incorporated. The egg binds the ingredients together and adds a slight richness. If you’re watching your calorie count, you can use a half‑egg or a flaxseed egg, but the texture will change slightly. Make sure the mixture is smooth before adding the dry ingredients.
- Sift together the rolled oats, all‑purpose flour, cinnamon, nutmeg, baking soda, and salt. Sifting removes clumps and ensures an even distribution of spices. This is where the magic of the cookie’s flavor profile starts to take shape. Add the dry mix to the wet ingredients in two portions, stirring gently after each addition.
- Fold in the butterscotch chips, making sure they’re evenly distributed. This step is critical because the chips are the highlight of the cookie. If you add them too early, they’ll melt into the dough, creating a greasy texture. Use a spatula to gently fold them in until the dough is a uniform light brown.
- Using a tablespoon or a small cookie scoop, drop rounded balls of dough onto the prepared baking sheets, spacing them about 2 inches apart. The dough will spread slightly, so give them enough room. A common mistake is to crowd the sheet, which leads to uneven baking. Watch the edges; they should just start to lift but not be too dark.
- Bake for 12–14 minutes, or until the edges are golden brown and the tops look set. The center should still feel slightly soft; it will firm up as they cool. The smell at this point is irresistible—think toasted sugar, butter, and a hint of spice. Keep an eye on them; ovens vary, and you want a perfect balance between crisp and chewy.
- Remove the baking sheets and let the cookies cool on the sheet for 5 minutes before transferring them to a wire rack. The cookies will continue to bake slightly on the hot sheet, so this step prevents overcooking. The cooling process also sets the structure, ensuring the chewy center doesn’t become gummy.
- Once cooled, store the cookies in an airtight container at room temperature for up to a week. If you want to keep them fresh longer, refrigerate them for up to two weeks and let them come to room temperature before eating. The cookies hold their texture and flavor well, making them a reliable treat for any occasion.
That’s it—you did it. But hold on, I’ve got a few more tricks that will take this to another level.
Insider Tricks for Flawless Results
The Temperature Rule Nobody Follows
Many bakers bake at a high temperature to get crisp edges, but this recipe thrives at 350°F. Baking too hot causes the butter to melt too quickly, spreading the dough and flattening the cookie. Keep the oven at 350°F to maintain the ideal balance of a crisp top and a chewy center. If your oven runs hot, preheat a baking stone to absorb excess heat.
Why Your Nose Knows Best
The scent of a cookie in the oven is a reliable indicator of doneness. When the aroma is rich and buttery, the cookies are nearly finished. Trust your nose; it’s better than a timer for many home bakers. The smell will signal when the edges are golden and the center is set.
The 5-Minute Rest That Changes Everything
After baking, let the cookies rest on the sheet for exactly five minutes. This short rest allows the structure to set, preventing the cookies from breaking when you transfer them to a rack. It also lets the butterscotch chips settle, ensuring a consistent bite throughout the cookie.
The Secret to a Crisper Edge
If you prefer a crunchier cookie, sprinkle a pinch of sea salt on top before baking. The salt enhances caramelization and adds a savory contrast to the sweetness. Be careful not to overdo it; too much salt can overpower the flavors.
The Magic of Chill
Chilling the dough for 30 minutes before baking yields a firmer cookie that holds its shape better. The cold butter solidifies, reducing spread. After chilling, let the dough sit at room temperature for 10 minutes so it’s easier to scoop.
The Perfect Bake Time
If you’re baking a large batch, rotate the pans halfway through. This ensures even heat distribution and prevents one side from overbrowning. Rotating also gives the cookies a uniform golden color.
Creative Twists and Variations
This recipe is a playground. Here are some of my favorite ways to switch things up:
Nutty Crunch Variation
Add a half cup of chopped toasted almonds to the dough for a nutty crunch. The almonds bring a subtle bitterness that balances the sweetness. This version is great for guests who love a bit of texture.
Chocolate‑Infused Delight
Swap the butterscotch chips for dark chocolate chunks. The bittersweet chocolate pairs beautifully with the cinnamon, creating a sophisticated flavor profile. The chocolate will melt slightly, adding a silky mouthfeel.
Coconut Twist
Replace half the oats with shredded coconut for a tropical vibe. The coconut adds a chewy texture and a subtle sweetness that complements the spices. This variation is perfect for summer afternoons.
Spiced Apple Add‑In
Fold in diced apples and a dash of ginger for a fall‑seasonal cookie. The apples provide moisture, while the ginger adds a peppery kick. Serve these with a dollop of whipped cream for a dessert that feels like a cozy evening.
Vegan Version
Use vegan butter, flaxseed egg, and dairy‑free butterscotch chips. The dough will be slightly denser but still delicious. This version allows you to share the joy with friends who have dietary restrictions.
Holiday Spice Boost
Add a pinch of clove and a splash of orange zest to the dough for a holiday twist. The clove adds warmth, while the orange zest brightens the flavor. This version is ideal for Christmas cookie trays.
Storing and Bringing It Back to Life
Fridge Storage
Store the cookies in an airtight container in the refrigerator for up to two weeks. The cold environment helps preserve the chewy texture and prevents the butter from softening. When you’re ready to enjoy, let them sit at room temperature for 10 minutes for a softer bite.
Freezer Friendly
Wrap individual cookies in parchment and place them in a freezer bag. They can be frozen for up to three months. When you’re ready to eat, thaw at room temperature for 20 minutes; the cookies will taste freshly baked.
Best Reheating Method
To revive a cold cookie, warm it in a preheated oven at 300°F for 5 minutes. Add a tiny splash of water to the bottom of the pan; the steam will re‑soften the center and restore moisture. This trick keeps the cookies from becoming stale.