A vibrant, mint‑kissed cupcake that captures the iconic Shamrock Shake in every bite.
Prep
Cook
Total
Servings
Difficulty
When I was a kid, the first thing that ever made my eyes light up at a fast‑food restaurant was the bright green Shamrock Shake. The sweet, creamy mint flavor was like a secret garden in a cup, and the neon color was pure magic. I still remember the excitement of holding that frosty, emerald‑colored shake, the way the mint aroma seemed to swirl around me as I took a sip. That memory stayed with me, tucked away like a hidden treasure, until one rainy afternoon when I decided to bring that nostalgic delight into my own kitchen.
The Shamrock Shake, originally a seasonal treat from a famous fast‑food chain, has become an emblem of St. Patrick’s Day celebrations across the United States. Its iconic mint‑chocolate flavor, combined with a splash of vanilla, creates a uniquely refreshing experience that feels both indulgent and comforting. Translating that experience into a handheld cupcake allows you to capture the essence of the shake while adding the joy of a soft, fluffy cake.
In this recipe, I’ll walk you through each step—from whisking the batter to achieving a perfectly smooth mint frosting—so you can recreate that iconic green goodness anytime you crave it. You’ll learn how to balance the mint flavor without overpowering the cake, how to achieve a velvety frosting that holds its shape, and how to decorate the cupcakes for that instant Instagram‑ready look.
So, roll up your sleeves, preheat that oven, and let’s embark on a culinary adventure that will bring a touch of Irish luck to your kitchen. I can’t wait to share every tip, trick, and little secret that makes these cupcakes truly unforgettable.
🌟 Why This Recipe Will Capture Your Heart
From the first bite to the final sprinkle, these cupcakes deliver a symphony of flavors and textures that keep you coming back for more.
- ✨ Irresistible Mint Flavor: The peppermint extract is balanced with vanilla, giving a fresh, clean taste that isn’t overly sweet.
- ✨ Perfect Moisture: The combination of buttermilk and melted butter creates a tender crumb that stays moist for days.
- ✨ Eye‑Catching Green Hue: A few drops of food‑grade coloring turn each cupcake into a festive masterpiece.
- ✨ Creamy Frosting: The butter‑cream frosting is light enough to pipe beautifully yet rich enough to satisfy.
- ✨ Versatile Garnishes: Add whipped cream, sprinkles, or fresh berries for a personalized touch.
- ✨ Crowd‑Pleaser: Whether it’s a St. Patrick’s Day party or a casual family gathering, these cupcakes delight guests of all ages.
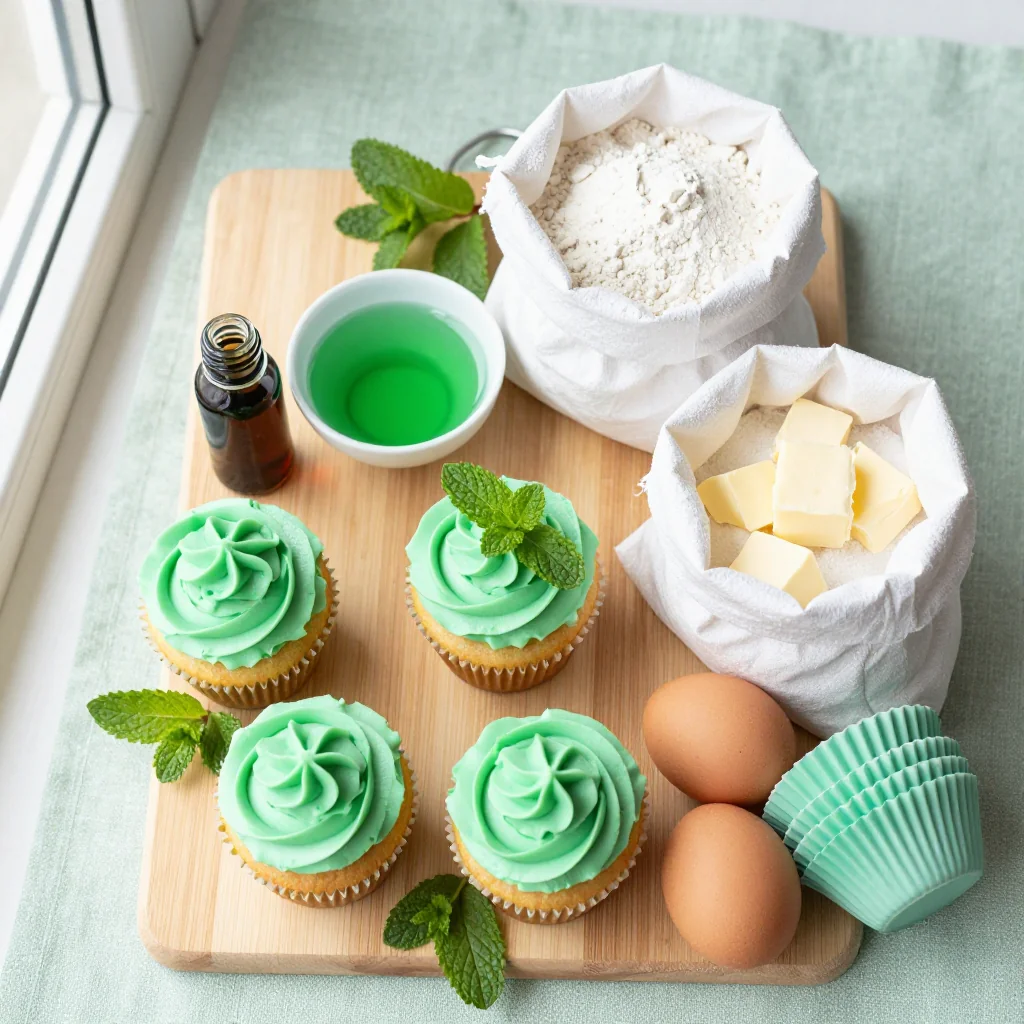
🥗 Ingredients
📝 Complete Ingredient List
For the Cupcake Batter:
For the Mint Frosting:
For the Garnish (optional):
🔍 Focus on Key Ingredients
All‑Purpose Flour
Flour provides the structural backbone of the cupcakes. Using a moderate amount of protein (around 10‑12 %) ensures a tender crumb while still holding the shape. For an extra light texture, sift the flour with the baking powder and soda before mixing.
Peppermint Extract
Peppermint extract is the star of the show. A little goes a long way, delivering a bright, refreshing flavor that mimics the classic Shamrock Shake without overwhelming the palate. Always choose a high‑quality, natural extract for the purest taste.
Heavy Cream
Heavy cream adds richness to the frosting while helping it stay silky and spreadable. When whipped, it creates a light, airy texture that balances the sweetness of the powdered sugar.
🔄 Quick Substitutions
| If you don’t have… | Use instead… |
|---|---|
| Buttermilk | Milk + 1 tbsp lemon juice (let sit 5 min) |
| Peppermint extract | Mint leaves blended with a splash of vodka (strain) |
| Unsalted butter | Salted butter (reduce added salt by ¼ tsp) |
👨🍳 Step‑by‑Step Instructions
Get ready to create a batch of cupcakes that look as festive as they taste. Follow each phase carefully, and you’ll have a flawless result every time.
📋 Phase 1: Preparation & Mise en Place
Set up your workspace and gather all tools before you start.
Preheat the Oven & Prepare the Tin
Preheat your oven to 350 °F (175 °C). While the oven warms, line a 12‑cup muffin tin with paper liners. This ensures easy removal and a tidy presentation.
Whisk the Dry Ingredients
In a large bowl, sift together the flour, baking powder, baking soda, and salt. This aerates the flour and eliminates lumps, giving you a light batter.
Combine Wet Ingredients
In a separate bowl, beat the eggs until frothy. Add melted butter, whole milk, buttermilk, and vanilla extract. Whisk until the mixture is smooth and glossy.
Mix Wet and Dry
Gradually pour the wet mixture into the dry bowl, stirring gently with a spatula. Stop as soon as the batter comes together; over‑mixing will produce dense cupcakes.
🔥 Phase 2: Baking & Frosting
From oven to frosting, this phase brings the cupcakes to life.
Fill the Liners & Bake
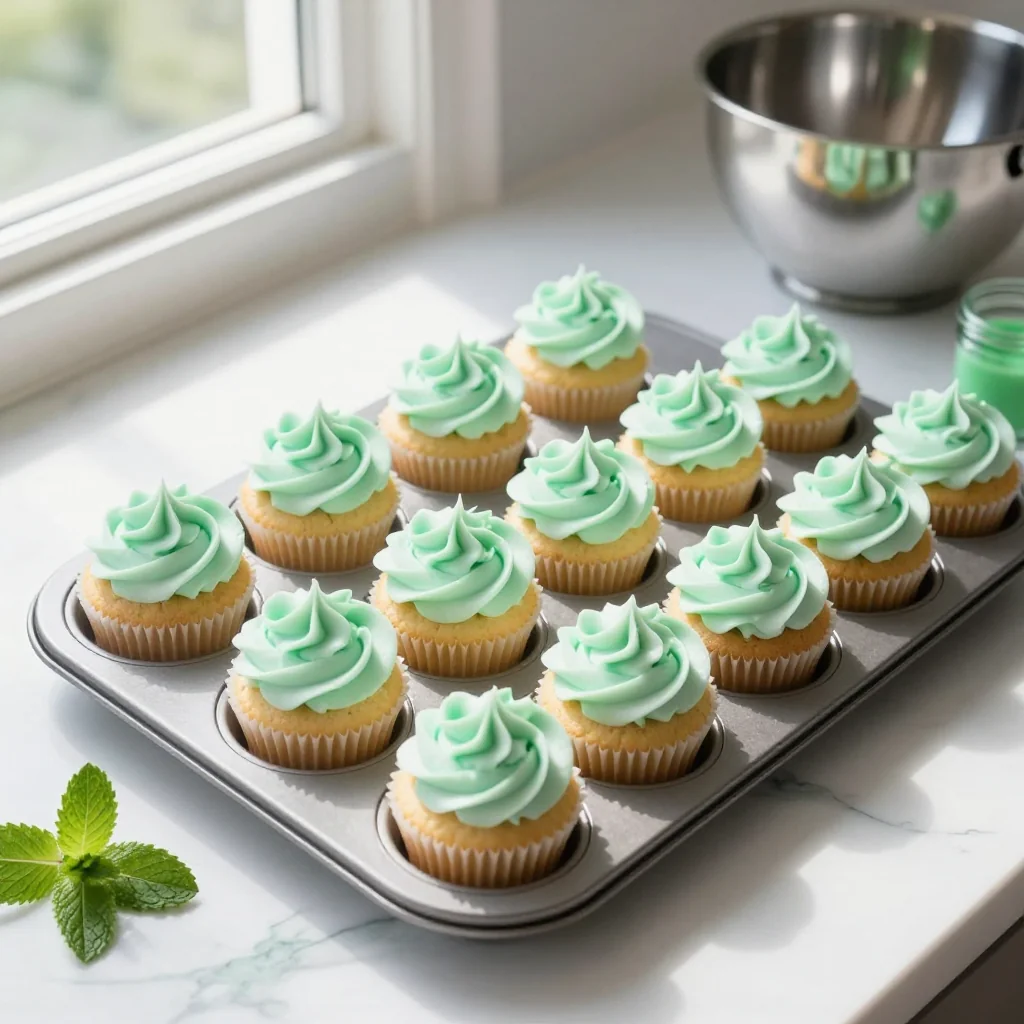
Divide the batter evenly among the 12 liners, filling each about three‑quarters full. Bake for 15‑18 minutes, or until a toothpick inserted into the center of a cupcake comes out clean.
Cool the Cupcakes
Allow the cupcakes to cool in the tin for 5 minutes, then transfer them to a wire rack. Let them cool completely before frosting; warm cupcakes cause frosting to melt.
Prepare the Mint Frosting
In a mixing bowl, beat the softened butter on medium speed until light and fluffy (about 2‑3 minutes). Gradually add powdered sugar, a little at a time, mixing on low to avoid a sugar cloud.
Once the sugar is incorporated, pour in the heavy cream and peppermint extract. Beat on high for 2‑3 minutes until the frosting is smooth, glossy, and holds soft peaks.
Finally, add a few drops of green food coloring and blend until you achieve a vibrant, but not overly dark, hue. Adjust the color by adding more drops if needed.
Pipe the Frosting
Fit a piping bag with a large star tip, fill it with the mint frosting, and pipe a generous swirl on each cooled cupcake. For a polished look, start from the outer edge and work inward.
✨ Phase 3: Finishing & Serving
Add the final touches that make these cupcakes shine.
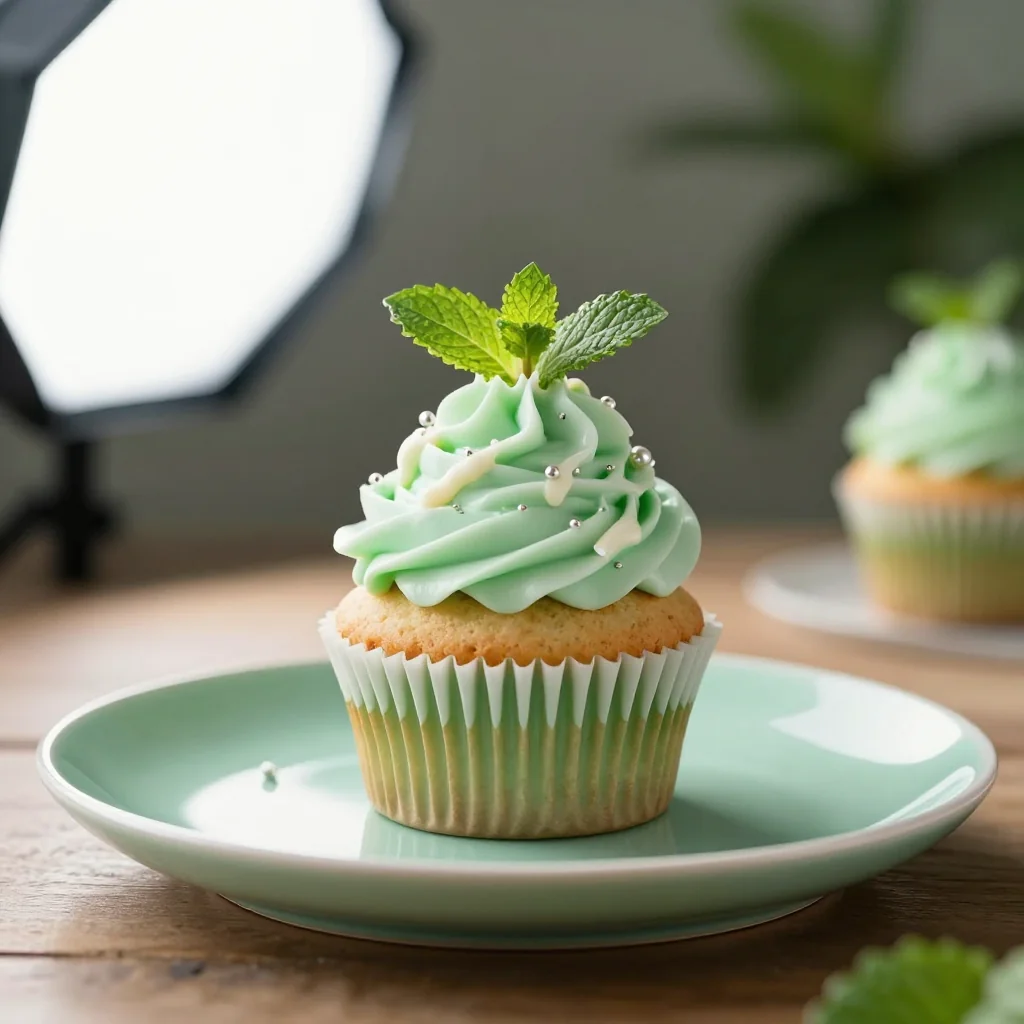
Garnish (Optional)
Top each cupcake with a dollop of freshly whipped cream and a sprinkle of green sprinkles for extra sparkle. The garnish adds texture and visual appeal.
Serve & Enjoy
Arrange the cupcakes on a decorative platter, serve at room temperature, and watch your guests’ faces light up with delight. Pair with a cold glass of milk or a cup of hot tea for the perfect balance.
💡 Expert Tips & Tricks
🛒 Choosing the Right Ingredients
When shopping for butter, opt for European‑style butter with a higher butterfat content; it yields a richer flavor and a smoother frosting. Fresh peppermint extract should have a clear, sharp aroma—avoid any that smell musty or overly sweet, as they can mask the minty notes. For flour, always check the expiration date; stale flour can produce a flat taste and affect the cupcake’s rise.
🔪 Preparation Techniques
Before measuring flour, spoon it into the measuring cup and level it off with a flat edge. This prevents packing and ensures you don’t use too much, which could make the cupcakes dense. When beating butter, start on low speed and gradually increase to medium; this prevents the butter from splattering and ensures an even, creamy base.
🌡️ Mastering the Baking Process
Position the oven rack in the middle of the oven for even heat distribution. Rotate the pan halfway through the baking time to avoid uneven browning. Use an instant‑read thermometer to verify the internal temperature reaches 200 °F (93 °C) for a perfectly baked cupcake.
🍽️ Presentation & Service
For a polished finish, pipe frosting in a tight spiral, then use a small offset spatula to smooth the peaks. Add a single green sprig of mint on top for a pop of color and a fragrant aroma that complements the mint flavor.
🏆 Pro Tips
Elevate your cupcakes from great to restaurant‑quality with these professional secrets.
- 🎯 Precise Temperature Control: Use a kitchen thermometer to monitor the butter’s temperature before creaming. Butter that’s too cold won’t incorporate air, while butter that’s too warm can cause the frosting to become runny.
- 🎯 Ingredient Scaling: When scaling the recipe for larger batches, keep the ratio of flour to liquid consistent (approximately 1 : 1.2). This maintains the crumb structure and prevents the cupcakes from becoming overly dry.
- 🎯 Air‑Lock Technique: After mixing, tap the batter‑filled tin gently on the counter to release any trapped air bubbles. This ensures a uniform rise and a smooth top.
- 🎯 Frosting Texture Mastery: Beat the frosting on high for the final 30 seconds to create a glossy finish that holds its shape even in warm kitchens.
- 🎯 Color Consistency: Add food coloring gradually and blend thoroughly after each addition. Too much color at once can stain the frosting unevenly, leading to blotchy patches.
- 🎯 Shelf‑Ready Decoration: If you plan to serve the cupcakes the next day, pipe the frosting first, then add the sprinkles just before serving to keep them crisp.
"A cupcake is a canvas; the frosting is the paint. Master the basics, and the masterpiece follows." — Dominique Crenn, Chef‑Owner of Atelier Crenn
🔄 Variations & Adaptations
These cupcakes are a versatile base that welcomes countless twists, whether you’re catering to dietary needs or experimenting with global flavors.
🥬 Vegetarian / Vegan Version
Swap the eggs for a flax‑seed “egg” (1 tbsp ground flaxseed mixed with 3 tbsp water) and use plant‑based butter. Replace dairy milk and buttermilk with oat milk mixed with a splash of lemon juice latter for buttermilk. For the frosting, use a vegan butter alternative and replace heavy cream with coconut cream.
- Flax “egg” – 1 tbsp ground flaxseed + 3 tbsp water (let sit 5 min)
- Vegan butter – 115 g plant‑based spread, softened
- Coconut cream – 120 ml, chilled and whipped
🌶️ Flavor Variations
Feel free to experiment with additional flavors that complement mint, or replace mint entirely for a new twist.
Spicy Version:
Add ¼ tsp cayenne pepper to the batter for a subtle heat that contrasts the cool mint. Garnish with a tiny pinch of smoked paprika for visual intrigue.
Mediterranean Version:
Incorporate finely chopped fresh rosemary into the batter and replace peppermint extract with a dash of olive oil‑infused rosemary essence. Top with a drizzle of honey for a sweet‑savory balance.
Asian Fusion Version:
Swap peppermint extract for matcha powder (2 tsp) and add 1 tbsp white sesame paste to the frosting. Garnish with toasted black sesame seeds for a nutty crunch.
⚠️ Dietary Adaptations
Gluten‑Free:
Replace all‑purpose flour with a 1:1 gluten‑free flour blend, ensuring it contains xanthan gum for structure. Add ¼ tsp xanthan gum if your blend doesn’t already contain it.
Lactose‑Free:
Use lactose‑free butter and substitute heavy cream with lactose‑free coconut cream or almond cream.
Low‑Calorie:
Reduce sugar by ¼ cup and replace half of the butter with unsweetened applesauce. This cuts calories while preserving moisture.
👶 Kid‑Friendly Version
For little ones who prefer milder flavors, halve the peppermint extract and add a swirl of vanilla buttercream on top. Use pastel green food coloring for a softer visual appeal.
📦 Storage & Reheating
🧊 Conservation
Refrigerator:
- Duration: 3 days
- Recommended container: airtight plastic container
- Tip: Store cupcakes with frosting on top to prevent the frosting from drying out.
Freezer:
- Duration: 2 months
- Method: Wrap each cupcake individually in plastic wrap, then place in a freezer‑safe bag.
- Defrosting: Transfer to the refrigerator overnight, then let sit at room temperature for 30 minutes before serving.
💡 For best texture, freeze the cupcakes without frosting, then frost after thawing.
♨️ Reheating
Oven (Recommended):
- Preheat to 175 °C (350 °F).
- Cover cupcakes loosely with foil.
- Heat for 8‑10 minutes.
- Remove foil and heat an additional 2‑3 minutes for a lightly crisp top.
Microwave (Quick):
- Place a cup of water in the microwave to add moisture.
- Heat on medium power for 20‑30 seconds.
- Check doneness; heat in 10‑second bursts if needed.
Stovetop:
Gently steam the cupcakes in a covered skillet with a splash of water for 3‑4 minutes. This method revives moisture without drying the frosting.
🍷 Perfect Pairings
🥗 Side Accompaniments
- Fresh Berry Salad: A mix of strawberries, blueberries, and mint leaves adds a bright contrast to the sweet cupcakes.
- Vanilla Ice Cream: A scoop of classic vanilla balances the minty intensity and adds a creamy texture.
- Whipped Cream with Cocoa Powder: Lightly dusted with cocoa, it offers a subtle chocolate note that mirrors the original shake.
🍷 Wine / Beverage Pairings
- Prosecco: Its crisp acidity cuts through the sweetness, enhancing the mint flavor.
- Irish Stout (e.g., Guinness): The roasted malt notes complement the chocolate undertones of the cupcake.
- Non‑Alcoholic: Sparkling water with a splash of lime or a mint‑infused lemonade.
🍰 For a Complete Meal
Start with a light citrus salad, follow with the mint cupcakes as a dessert, and finish with a small serving of dark chocolate truffles. The progression from bright to rich keeps the palate engaged.
❓ Frequently Asked Questions
Q: Can I use a different type of milk?
A: Absolutely! Almond milk, oat milk, or soy milk can replace whole milk. For a richer flavor, use full‑fat coconut milk, but be aware it adds a subtle coconut note.
Q: How do I achieve a deeper green color without using artificial dye?
A: Fresh spinach puree (about 2 tbsp) can provide a natural green hue. Blend the spinach, strain, and add a few teaspoons of the puree to the frosting. Adjust the amount until you reach the desired shade.
Q: What if I don’t have a piping bag?
A: A zip‑top bag works perfectly—just cut a small corner off the tip. For a rustic look, simply spread the frosting with a spatula.
Q: My cupcakes turned out dense. What went wrong?
A: Over‑mixing the batter or using too much flour can cause density. Be sure to mix until just combined and measure flour correctly. Also, verify your oven temperature with an oven thermometer; too hot can cause the batter to set before rising.
Q: Can I add chocolate chips?
A: Yes! Fold ½ cup of mini chocolate chips into the batter for a delightful chocolate‑mint combo. Add them after the wet and dry ingredients are combined.
Q: How far in advance can I frost the cupcakes?
A: Frosting can be done up to 24 hours ahead if stored in the refrigerator. Bring them to room temperature before serving for optimal flavor.
🎉 Let’s Get Baking!
These Shamrock Shake Cupcakes bring the nostalgic flavor of the classic shake into a handheld treat that’s perfect for celebrations, brunches, or a simple afternoon treat. The balance of minty frosting and moist cake makes them a standout dessert that will impress both kids and adults alike. By following the detailed steps and pro tips, you’ll achieve a consistent, bakery‑level result every time.
Don’t forget to share your creations! Post a photo on Instagram with #ShamrockCupcakes, leave a comment below, and let the community know how you personalized the recipe. Your feedback helps us improve and inspires other bakers to experiment.
Have you tried this recipe?
Leave a comment and rating below! Share your photos on Instagram with #ShamrockCupcakes to be featured on our site.
Shamrock Shake Cupcakes with Mint Frosting
Vibrant mint cupcakes that capture the classic Shamrock Shake in a handheld treat.
Prep
Cook
Total
Servings
Per serving
Difficulty