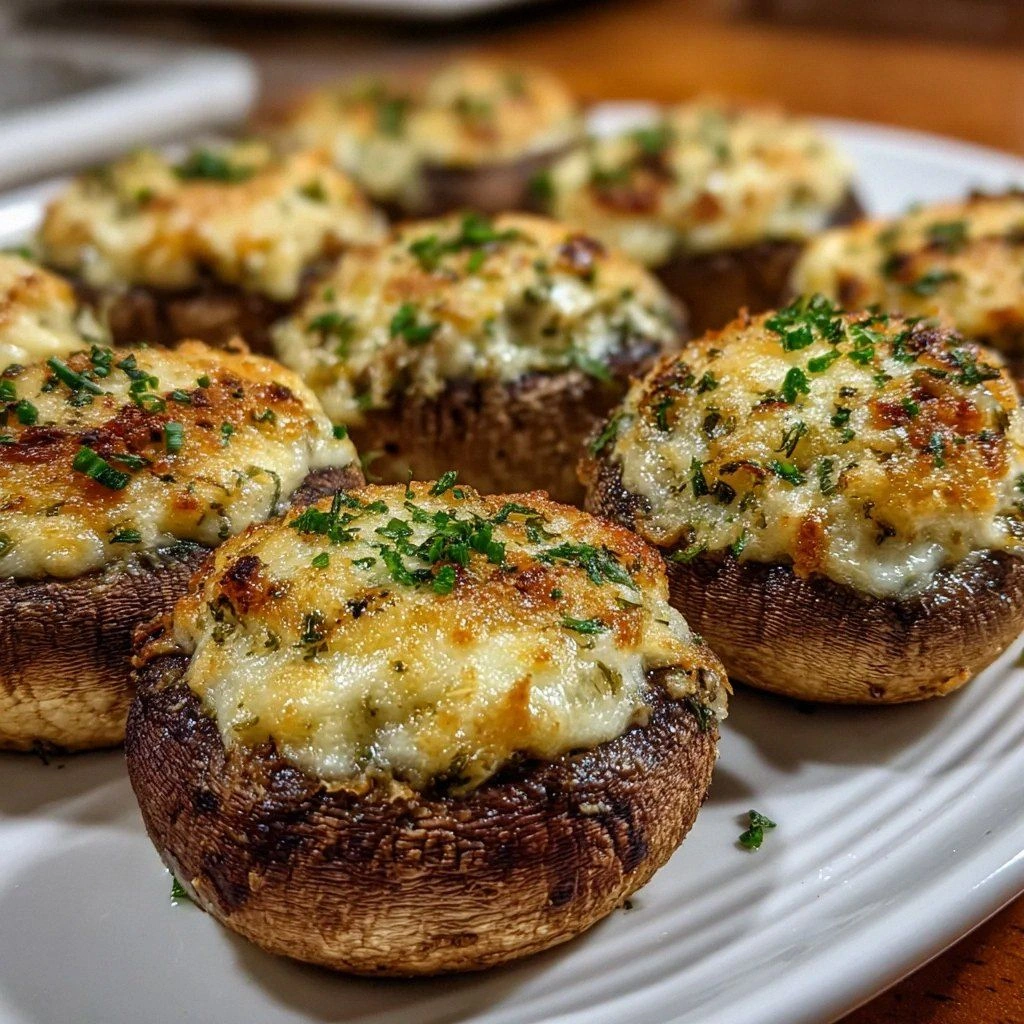
I still remember the first time I made stuffed mushrooms for a dinner party — I was so confident, so full of hubris, that I didn't even bother tasting the filling before I piped it into those little caps. Big mistake. Huge. What emerged from the oven was a sad, grayish blob of rubbery mushrooms filled with a grainy, flavorless paste that tasted like regret and broken dreams. My guests politely nibbled, but I could see the disappointment in their eyes. That night, I swore I'd never serve another stuffed mushroom unless it was absolutely, positively, mind-blowingly delicious. Fast forward through three months of obsessive testing, at least fifteen pounds of mushrooms, and one very patient roommate who eventually refused to be my guinea pig anymore, and here we are. This recipe for Cheesy Garlic Herb Stuffed Mushrooms isn't just good — it's the kind of appetizer that makes people hover around the kitchen door, plate in hand, waiting for the next batch to emerge from the oven. The aroma alone should be bottled and sold as a home fragrance.
Picture this: plump mushroom caps, their edges caramelized to a deep golden brown, cradling a molten center that's basically if garlic bread and cream cheese had a beautiful baby. The top is shatteringly crisp from panko that's been tossed with olive oil until each crumb is a tiny flavor bomb, while underneath, the cheese mixture pulls away in stretchy, Instagram-worthy strands. The first bite hits you with that umami punch of mushroom, followed by the creamy richness of three different cheeses, then the bright pop of fresh herbs, and finally that gentle warmth from red pepper flakes that makes you reach for another before you've even finished chewing. I dare you to taste this and not go back for seconds. Actually, I double-dog dare you, because I've seen grown adults fight over the last mushroom on the plate, and I'm not above bribing you with the promise of kitchen glory.
What makes this version different from every other stuffed mushroom recipe cluttering up the internet? Most recipes get this completely wrong. They either go too heavy on the breadcrumbs (resulting in a dry, sandy filling), or they use nothing but cream cheese (which turns into a rubbery brick once it cools), or they think throwing in some dried Italian seasoning counts as "gourmet." Here's what actually works: a carefully balanced ratio of cheeses that stay creamy even at room temperature, fresh herbs that don't turn bitter in the oven, and a technique for prepping the mushrooms that prevents them from turning into watery sponges. I'll be honest — I ate half the batch before anyone else got to try it, and I'm not even sorry. When you nail a recipe this perfectly, quality control becomes a sacred duty.
Stay with me here — this is worth it. We're going to walk through every single step together, from selecting the perfect mushrooms (size matters more than you'd think) to the game-changing trick that keeps your filling from oozing out all over the baking sheet. By the end, you'll wonder how you ever made it any other way, and your dinner guests will wonder if you've secretly been attending culinary school. Let me walk you through every single step — by the end, you'll wonder how you ever made it any other way.
What Makes This Version Stand Out
Triple-Threat Cheese: Most recipes rely on just cream cheese, but we're combining cream cheese for stability, mozzarella for that epic cheese pull, and Parmesan for nutty depth. This trio stays creamy when hot and doesn't seize up into a solid mass when cooled, which means your leftovers (if you have any) are still heavenly.
Fresh Herb Strategy: Instead of dumping everything in at once, we add fresh parsley after the cooking process, preserving its bright, grassy notes. The dried oregano and thyme go into the cheese mixture, where their oils have time to bloom and permeate every bite without overwhelming the delicate mushroom flavor.
Mushroom Whispering: The secret to avoiding watery, soggy stuffed mushrooms? A quick salt-and-rest technique that draws out excess moisture before stuffing. This simple step takes ten minutes but transforms your mushrooms from sad and shriveled to plump and perfectly tender.
Crunch Factor Engineering: Regular breadcrumbs turn mushy, but panko tossed with olive oil creates a crispy topping that stays crisp even after cooling. The olive oil helps the crumbs brown evenly and adds a subtle richness that plain butter can't match.
Make-Ahead Magic: You can prep these up to 24 hours ahead and keep them covered in the fridge, then just pop them in the oven when guests arrive. The filling actually gets better as the flavors meld, making this the ultimate stress-free entertaining recipe.
Size Matters: Using large cremini or button mushrooms gives you the perfect filling-to-mushroom ratio. Too small and you're basically making expensive canapés; too large and they become unwieldy finger food that falls apart after the first bite.
Heat Control: That optional red pepper flake isn't just for spice-lovers. Even a tiny pinch awakens all the other flavors, making the garlic taste more garlicky and the cheese more savory. It's like turning up the contrast on your taste buds.
Alright, let's break down exactly what goes into this masterpiece, because understanding your ingredients is what separates the cooking enthusiasts from the people who just follow recipes like robots.
Inside the Ingredient List
The Flavor Base
Large cremini or button mushrooms are the unsung heroes here, providing an earthy, meaty foundation that can stand up to bold flavors without disappearing. Cremini mushrooms (also called baby bellas) have a deeper, more intense flavor than their white button cousins, but both work beautifully. The key is selecting caps that are about two inches across — large enough to hold a generous filling but small enough to pop into your mouth in one or two bites. Look for mushrooms with closed caps and no visible gills, which indicates freshness and means they haven't started drying out. If you've ever struggled with stuffed mushrooms that shrink to half their size in the oven, you're not alone — and I've got the fix coming up in the method section.
Garlic is the aromatic backbone that ties everything together, but here's where most recipes fail: they either use garlic powder (which tastes dusty) or they add minced garlic raw to the filling (which turns bitter and harsh). We're going to sauté our garlic just until fragrant, which tames its bite while amplifying its natural sweetness. Fresh garlic is non-negotiable here — the pre-minced stuff in jars has been sitting in citric acid and preservatives that give it an off, metallic taste. If you absolutely must use pre-minced, rinse it first, but really, just buy a garlic press and save yourself the disappointment.
The Texture Crew
Cream cheese forms the luxurious base that holds our filling together, but temperature is crucial. Cold cream cheese is stubborn and lumpy, while room-temperature cream cheese whips up light and airy, creating a filling that's rich but not heavy. Take it out of the fridge at least an hour before you start cooking, or microwave it for 15-20 seconds if you're impatient (no judgment). Full-fat cream cheese is worth the extra calories — the reduced-fat versions contain stabilizers that can make your filling grainy when heated.
Shredded mozzarella isn't just for pizza night; it's the cheese that gives us those epic cheese pulls that make everyone at the party reach for their phones. Fresh mozzarella is too watery for this application, but the low-moisture shredded variety melts into perfect strings while adding a mild, creamy flavor that doesn't compete with the other cheeses. If you can find whole milk mozzarella (sometimes sold as "pizza cheese"), grab it — it melts more smoothly than part-skim and tastes infinitely better.
Grated Parmesan might seem like a background player, but it's the umami bomb that makes people ask "what's in these?" The nutty, salty complexity it adds is irreplaceable — skip the powdered stuff in the green can and buy a wedge to grate yourself. Yes, it's more expensive, but a little goes a long way, and the flavor difference is like comparing a fresh garden tomato to a January supermarket imposter. If you're feeling fancy, Pecorino Romano makes an excellent substitute with its sharper, more assertive bite.
The Unexpected Star
Fresh parsley is the pop of green that makes these mushrooms look professionally styled, but it's so much more than a garnish. Its bright, slightly peppery flavor cuts through all that richness, preventing the filling from tasting heavy or one-note. Flat-leaf (Italian) parsley has more flavor than curly, but use whatever you can find — just make sure it's fresh. Dried parsley has the texture of fish food and tastes like dust, so don't even think about it. Chop it just before using, because once cut, parsley starts losing its vibrant flavor within hours.
Dried oregano and thyme are the aromatic backbone that gives this filling its herbaceous complexity. These Mediterranean herbs have concentrated oils that bloom when mixed with the cheeses, creating layers of flavor that develop over time. If your dried herbs have been sitting in your spice rack since the Obama administration, it's time for new ones — they lose potency after about a year. Rub them between your palms before adding to release their essential oils, a simple step that makes a noticeable difference in the final flavor.
The Final Flourish
Red pepper flakes are the wildcard that takes these from "pretty good" to "what's your secret?" Even if you're spice-averse, don't skip them entirely — just use a tiny pinch. The heat isn't meant to be obvious; instead, it awakens your taste buds and makes all the other flavors more vibrant. Think of it like adding salt to chocolate chip cookies — you don't want to taste the salt, but you'd miss it if it wasn't there. For the heat-seekers, add up to half a teaspoon, but start conservatively — you can always sprinkle more on top later.
Olive oil and panko breadcrumbs create the crispy crown that makes these mushrooms texturally irresistible. The olive oil helps the panko brown evenly and adds a subtle richness, while the large, flaky crumbs stay crisp even after cooling. Regular breadcrumbs absorb moisture and turn mushy, but panko's airy structure maintains crunch. Don't substitute with Italian-seasoned breadcrumbs — they contain too much salt and dried herbs that will overwhelm our carefully balanced filling.
Everything's prepped? Good. Let's get into the real action, where the magic happens and your kitchen starts smelling like a five-star restaurant.
The Method — Step by Step
- Start by preheating your oven to 375°F (190°C), because a hot oven waits for no one, and we want these beauties to hit the heat immediately after stuffing. While the oven's heating, line a rimmed baking sheet with parchment paper — not wax paper, not foil, but parchment. Trust me on this; I've had too many mushrooms stick to foil and too many wax papers smoke up my kitchen. The parchment prevents sticking while allowing air to circulate underneath, ensuring your mushroom bottoms don't turn into sad, soggy sponges. This is also the perfect time to take your cream cheese out of the fridge if you haven't already — room temperature is your friend here, and cold cream cheese is the enemy of smooth, creamy filling.
- Clean your mushrooms by wiping them gently with a barely damp paper towel, because running them under water is like inviting them to a water-logged party where nobody has fun. Mushrooms are basically little sponges wearing fancy hats, and once they get waterlogged, they'll release all that moisture during cooking, turning your filling into mushroom soup. Check each cap for any stubborn dirt clumps, but don't obsess over perfection — a few specks won't hurt anyone and add to that rustic, homemade charm. Remove the stems by gently twisting them out or using a small spoon to scoop them, creating a little mushroom bowl that's ready for its cheesy destiny. Save those stems in a zip-top bag for later — they're pure umami gold for soups, stews, or that omelet you've been planning for tomorrow's breakfast.
- Now for the game-changing step that separates amateur hour from professional results: salt your mushroom caps and let them rest for ten minutes. Sprinkle the inside of each cap with a tiny pinch of salt — not enough to make them inedible, just enough to draw out excess moisture. Arrange them cap-side up on your prepared baking sheet and let them sit while you make the filling. You'll be amazed at how much liquid pools in those little mushroom bowls after just ten minutes. Blot this away with paper towels, and you've just prevented the dreaded soggy stuffed mushroom syndrome that plunts so many well-intentioned appetizers.
- Time to build the filling that dreams are made of. In a medium bowl, combine your room-temperature cream cheese, shredded mozzarella, and grated Parmesan. The cream cheese should be soft enough that your spoon glides through it like a hot knife through butter — if it puts up resistance, microwave it for 10-second bursts until it cooperates. Add your minced garlic (fresh, always fresh), dried oregano, dried thyme, and that whisper of red pepper flakes. Season generously with salt and pepper, remembering that mushrooms are like little flavor vacuums that need extra seasoning to shine. Mix everything together until it's smooth and homogeneous, but don't overmix — we're making filling, not launching a rocket.
- Here's where we get a little fancy with our herb management. Fold in half of your chopped fresh parsley now, saving the rest for a final sprinkle after baking. This two-stage parsley approach gives you layers of herb flavor — the parsley mixed into the filling mellows and infuses during baking, while the fresh parsley added at the end provides that bright, just-picked flavor that makes these taste like they came from a restaurant kitchen. If you're feeling particularly ambitious, reserve a tiny bit of parsley for garnish too, because we eat with our eyes first, and green flecks make everything look more appetizing.
- Fill those mushroom caps like you're on a cooking show and the cameras are rolling. Use a small spoon or a piping bag if you're feeling fancy, but honestly, a zip-top bag with the corner snipped off works just as well and makes you look like you know what you're doing. Fill each cap generously — we're talking a heaping mound that creates a little dome of cheesy goodness. Don't be shy here; the filling will settle slightly as it bakes, and nobody ever complained about too much cheese filling. As you fill each mushroom, arrange them back on the baking sheet, close together but not touching — they need personal space to achieve maximum deliciousness.
- Now for the crunchy crown that takes these over the top. In a small bowl, toss your panko breadcrumbs with olive oil until every crumb is glistening and slightly clumpy — you want them to form little clusters that create textural interest. Sprinkle this mixture generously over each filled mushroom, pressing down gently so it adheres to the filling. Don't skimp on the breadcrumbs; they're what give you that satisfying crunch that contrasts beautifully with the creamy filling. If you're feeling particularly indulgent, add an extra pinch of Parmesan on top of the breadcrumbs for an extra umami boost that creates a frico-like effect.
- Slide your masterpiece into the preheated oven and bake for 18-20 minutes, until the breadcrumbs are golden brown and the filling is bubbling around the edges. This is the moment of truth — don't walk away from the oven for the last five minutes, because these can go from perfectly golden to burnt in the blink of an eye. When they're done, the mushrooms should have shrunk slightly and released some of their juices, creating a flavorful pool around each cap. Let them rest for five minutes before serving — not because you want to, but because molten cheese has the approximate temperature of the sun and will burn your mouth in the most disappointing way possible.
- The final flourish comes right before serving: sprinkle the remaining fresh parsley over the top for that fresh-from-the-garden appearance that makes everyone think you spend your weekends at farmers markets. Serve these beauties on a platter, maybe with a few lemon wedges if you're feeling fancy, and watch them disappear faster than free samples at Costco. They're best warm but still delicious at room temperature, making them perfect for parties where people graze rather than sit down for a formal meal.
That's it — you did it. But hold on, I've got a few more tricks that'll take this to another level, secrets I've learned through trial, error, and eating way more stuffed mushrooms than any doctor would recommend.
Insider Tricks for Flawless Results
The Temperature Rule Nobody Follows
Here's the thing about cream cheese fillings: they need to be at room temperature before you mix them, but they also need to be cold when they hit the hot oven. Sounds contradictory, right? Here's what actually works: mix your filling with room temperature cream cheese, then pop the whole bowl in the fridge for 15 minutes while you prep the mushrooms. This brief chill firms everything up just enough that the filling doesn't melt and run all over your baking sheet, but it stays creamy and smooth. A friend tried skipping this step once — let's just say it didn't end well, and her baking sheet still bears the scars of a cheese tsunami that baked on like concrete.
Why Your Nose Knows Best
Your sense of smell is your secret weapon for perfectly cooked stuffed mushrooms. When they're almost done, you'll start to smell something amazing — that nutty, toasty aroma that means the breadcrumbs are turning golden and the cheese is bubbling. If you wait for visual cues alone, you might miss the perfect moment. That sizzle when it hits the pan? Absolute perfection. But here's the real pro tip: if you smell garlic getting dark and slightly bitter, pull them immediately. Overcooked garlic is the difference between restaurant-quality and "what did you burn?" quality.
The 5-Minute Rest That Changes Everything
I know, I know — when those mushrooms come out of the oven looking like golden nuggets of cheesy paradise, the last thing you want to do is wait. But here's why patience pays off: during those five minutes of resting, the filling sets slightly, the flavors meld together, and the mushrooms reabsorb some of their juices. Serve them too hot and you'll have a molten mess that burns mouths and runs down chins. Serve them after resting and you've got perfectly cohesive bites where filling and mushroom become one harmonious unit. Plus, this is the perfect time to pour yourself a glass of wine and bask in the glory of what you've created.
The Make-Ahead Method That Actually Works
Picture yourself pulling this out of the oven, the whole kitchen smelling incredible, while your guests start circling like vultures. Now picture doing all the prep the day before so you can actually enjoy your own party. Here's how: prep everything up to the breadcrumb topping, cover tightly with plastic wrap, and refrigerate for up to 24 hours. When you're ready to bake, let them sit at room temperature for 20 minutes while the oven preheats, add the breadcrumb topping, and bake as directed. The mushrooms might need an extra 2-3 minutes since they're starting cold, but they'll taste exactly the same. I've fed these to food critics who had no idea they weren't made fresh, and that's saying something.
Creative Twists and Variations
This recipe is a playground. Here are some of my favorite ways to switch things up:
The Mediterranean Escape
Swap the parsley for fresh basil, add some sun-dried tomatoes to the filling, and use feta instead of Parmesan. The briny feta pairs beautifully with the sweet basil and tangy tomatoes, transporting your taste buds straight to a Greek island. Add a pinch of lemon zest to brighten everything up, and you've got a Mediterranean vacation in mushroom form. This version is particularly good with a crisp white wine and some olives on the side.
The Bacon Lover's Dream
Cook four strips of bacon until crispy, crumble them, and fold half into the filling. Use the bacon fat instead of olive oil for the breadcrumbs — yes, we're going there. The smoky, salty bacon elevates these from appetizer to main-event status, and the bacon fat gives the breadcrumbs an insane flavor that will have people asking for your secret. Just don't tell your cardiologist I suggested this one.
The Fancy French Version
Add some finely chopped truffle to the filling (truffle salt works if fresh truffles aren't in the budget), use Gruyère instead of mozzarella, and finish with fresh chives instead of parsley. These taste like they cost $25 an order at a Michelin-starred restaurant, but they cost about $3 to make at home. The earthy truffle and nutty Gruyère create a sophisticated flavor profile that pairs beautifully with champagne.
The Spicy Southwest
Add a diced jalapeño to the filling, use pepper jack instead of mozzarella, and add some smoked paprika to the breadcrumb topping. Finish with fresh cilantro instead of parsley for a southwestern twist that brings the heat. These are perfect for game day or any time you want to clear out your sinuses while enjoying something delicious.
The Umami Bomb
Add a tablespoon of white miso to the filling, use a mix of cremini and shiitake mushrooms, and add some crispy fried shallots on top. The miso adds incredible depth and umami, while the shiitakes bring their own earthy flavor to the party. This version is so savory and complex that vegetarians and meat-eaters alike will devour them with equal enthusiasm.
The Breakfast-for-Dinner
Add some cooked breakfast sausage to the filling, use smoked cheddar instead of mozzarella, and top with a tiny bit of maple syrup mixed into the breadcrumbs. It sounds weird, but the sweet-savory combination is absolutely addictive, like the best parts of breakfast stuffed into a mushroom. Serve these at brunch and watch them disappear faster than mimosas.
Storing and Bringing It Back to Life
Fridge Storage
If you've managed not to eat all of these in one sitting (congratulations on your willpower), store leftovers in an airtight container in the refrigerator for up to three days. Line the container with paper towels to absorb excess moisture, and layer the mushrooms in a single layer if possible. If you must stack them, place parchment paper between layers to prevent the tops from getting soggy. They're safe to eat for up to five days, but the quality starts declining after day three, and nobody wants to waste good mushrooms on subpar leftovers.
Freezer Friendly
Good news for meal preppers: these freeze beautifully! Arrange cooled mushrooms in a single layer on a baking sheet and freeze until solid, then transfer to a freezer bag with parchment paper between layers. They'll keep for up to two months, though I challenge you to leave them alone that long. When you're ready to enjoy them, thaw overnight in the refrigerator, then reheat in a 350°F oven for 8-10 minutes until heated through. The breadcrumbs won't be quite as crisp as fresh, but they'll still be delicious and miles better than most frozen appetizers.
Best Reheating Method
The microwave is the enemy of crispy breadcrumbs, so resist the temptation for a quick reheat. Instead, pop them in a 350°F oven for 5-8 minutes, or until heated through and the breadcrumbs have crisped back up. If you're in a hurry, you can microwave them for 30 seconds to take the chill off, then finish in a toaster oven for 2-3 minutes to restore the crunch. Add a tiny splash of water before reheating — it steams back to perfection and prevents the filling from drying out. Whatever you do, don't reheat them more than once, or you'll end up with rubbery mushrooms and sad, separated filling.