Introduction
Picture this: I was in the middle of a frantic bake‑out, a dozen chocolate chip cookies already in the oven, when suddenly the timer beeped and the kitchen smelled like burnt sugar. I stared at the cookie sheet, heart sinking, until a friend pulled out a handful of lemons and said, “Why not try a lemon crinkle?” The idea was as wild as it was delicious. That single suggestion turned a kitchen disaster into a revelation, and I’ve been chasing that perfect bite ever since. I’m not talking about a bland, ordinary cookie; I’m talking about a bright, citrus‑kissed treat that curls up into a snow‑covered masterpiece, each bite a burst of zesty sunshine.
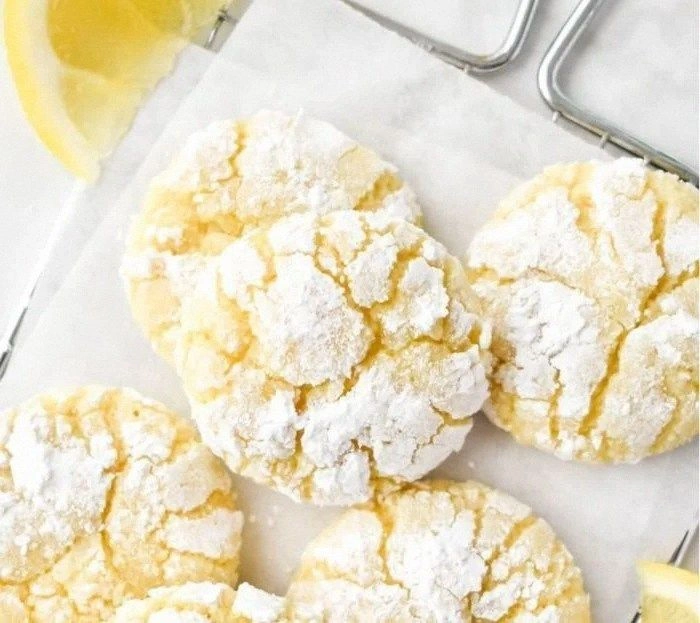
From the first glance, the dough feels like a buttery cloud—soft, pliable, and humming with anticipation. As you stir, the sweet scent of sugar mingles with the sharp, citrusy aroma of fresh lemon zest, a smell that instantly lifts the room. When the cookies bake, they transform into golden crescents, their edges crisping like a sun‑baked horizon. The moment you break one open, a faint crackle of powdered sugar dusts the interior, turning the bite into a sweet, tangy explosion that tastes like a summer day on a spoon. And the texture? Imagine biting into a cloud that’s both chewy and crisp—soft in the center, crisp on the edges, with a sugary crumble that melts in your mouth.
This version of Lemon Crinkle Cookies is the culmination of countless experiments, a recipe that balances acidity, sweetness, and texture in perfect harmony. It’s the kind of cookie that doesn’t just satisfy a craving; it turns a simple snack into an experience. The secret? A meticulous blend of fresh lemon juice and zest, a precise ratio of leavening agents, and an unexpected coating of powdered sugar that crinkles like freshly fallen snow. The result is a cookie that is bright, buttery, and irresistibly addictive—hands down the best version you’ll ever make at home.
And here’s the kicker: the twist you won’t see in any other recipe is the subtle use of baking soda, which reacts with the lemon juice to create a light, airy interior that defies the dense, buttery texture most crinkle cookies have. I dare you to taste this and not go back for seconds. Let me walk you through every single step—by the end, you’ll wonder how you ever made it any other way.
What Makes This Version Stand Out
- Taste: The bright, tangy lemon flavor is balanced by a generous amount of sugar, creating a sweet‑tart harmony that lingers on the palate. The zest adds a fragrant depth that elevates the cookie beyond ordinary citrus treats.
- Texture: The dough’s buttery richness gives a tender crumb, while the powdered sugar coating delivers a delightful crunch and a subtle crinkle that looks as good as it tastes.
- Simple Ingredients: With just eight pantry staples and a splash of lemon, this cookie is accessible to anyone—no fancy equipment or obscure ingredients required.
- Unique Finish: The powdered sugar coating creates a signature “crinkle” effect that’s both visual and tactile, setting these cookies apart from flat or chewy cousins.
- Crowd‑Pleaser: Whether you’re hosting a brunch or packing a snack for the office, these cookies receive rave reviews at every gathering—most people ask for the recipe after the first bite.
- Ingredient Quality: Using fresh lemons and real butter instead of substitutes ensures maximum flavor, making every bite a testament to quality.
- Efficient Method: The dough is ready in 15 minutes, and the baking time is just 30 minutes—ideal for a quick dessert that doesn’t compromise on taste.
- Make‑Ahead Friendly: Once baked, these cookies keep well in an airtight container, and you can even freeze them for future indulgence.
Alright, let's break down exactly what goes into this masterpiece…
Inside the Ingredient List
The Flavor Base
At the heart of these cookies lies a duo of sweetness and brightness: granulated sugar and fresh lemon juice. Sugar is not just a sweetener; it caramelizes during baking, giving the cookies a golden sheen and a subtle crunch. Lemon juice, on the other hand, is the flavor engine, cutting through the richness of butter and adding a crisp, tangy note that keeps the cookies from feeling heavy. If you skip the juice, the cookie will be bland and flat, lacking that refreshing lift that makes them so memorable.
The Texture Crew
Butter is the star of the texture crew. When softened to room temperature, it blends smoothly with sugar, creating a creamy base that expands as it bakes. The egg acts as a binder, holding everything together while adding a chewy bite. Baking powder and soda are the silent partners; they react with the lemon juice to produce tiny bubbles that lift the dough, giving the cookies a light, airy interior that contrasts with their crisp edges. A pinch of salt is essential—it balances sweetness and enhances the lemon’s brightness. If you omit salt, the cookies will taste flat and overly sweet.
The Unexpected Star
Powdered sugar is the unexpected star that turns a plain cookie into a visual and textural delight. When rolled in powdered sugar before baking, it creates a snowy, crinkled surface that’s both eye‑catching and deliciously sweet. The sugar also caramelizes slightly, adding a subtle crunch that’s a welcome contrast to the buttery softness. If you prefer a less sweet finish, simply reduce the amount of powdered sugar or dust it lightly after baking.
The Final Flourish
All‑purpose flour is the backbone of the dough, providing structure and stability. A touch of baking powder and soda ensures the cookies rise just enough to stay tender inside while crisping up on the outside. The lemon zest is the finishing flourish that delivers a burst of citrus aroma with every bite. If you’re adventurous, you can add a pinch of dried lavender or a splash of orange zest to create a multi‑dimensional citrus profile. Remember, the key to a great crinkle cookie is the harmony between the dry and wet ingredients; too much flour will make them dry, too little will cause them to spread too thin.
Everything's prepped? Good. Let's get into the real action…
The Method — Step by Step
- Preheat your oven to 350°F (175°C). Line a baking sheet with parchment paper; this will prevent sticking and make cleanup a breeze. While the oven warms, gather all ingredients—this prep ensures a smooth workflow. I love to set a timer for 5 minutes to keep the process on track.
- In a large bowl, cream together 1 cup of granulated sugar and ½ cup of softened butter until light and fluffy. Use an electric mixer on medium speed for about 2 minutes; the mixture should be pale and airy. The key here is to fully incorporate the butter so it doesn’t clump, which would affect the cookie’s rise.
- Beat in 1 egg until the mixture is smooth and homogeneous. The egg will act as a binder, giving the cookies structure and a slight chewiness. If you’re vegan, substitute with a flax egg—mix 1 tablespoon of flaxseed meal with 2.5 tablespoons of water, let it sit for 5 minutes, then whisk into the dough.
- Stir in 2 tablespoons of fresh lemon juice and 1 tablespoon of lemon zest. The juice adds brightness, while the zest gives aroma and subtle flavor. This is the moment where the cookie’s personality shines—don’t skip it. If you’re using bottled lemon juice, you’ll miss that fresh, vibrant punch.
- In a separate bowl, whisk together 1½ cups of all‑purpose flour, ½ teaspoon baking powder, ¼ teaspoon baking soda, and ¼ teaspoon salt. Mixing the dry ingredients first ensures even distribution of leavening agents, preventing uneven rise or dense spots.
- Gradually fold the dry mixture into the wet batter, mixing until just combined. Over‑mixing can toughen the cookies, so stop as soon as the flour is incorporated. The dough should be slightly sticky but manageable.
- Scoop tablespoon‑sized balls of dough onto the prepared sheet, spacing them 2 inches apart. Roll each ball lightly in powdered sugar before baking; this creates the signature crinkle effect. The sugar coating also adds a subtle crunch when the cookies bake.
- Bake for 12–14 minutes, or until the edges turn golden brown and the centers set. The cookies should still feel slightly soft in the middle; they’ll firm up as they cool. Watch the time closely—overbaking will turn them into hard, dry biscuits.
- Remove from the oven and let them cool on the sheet for 5 minutes before transferring to a wire rack. This short rest allows the cookies to set without cracking. If you move them too soon, the delicate structure may collapse.
- Serve immediately or store in an airtight container at room temperature for up to a week. For extra freshness, place a slice of bread in the container; it will absorb excess moisture and keep the cookies crisp.
That's it—you did it. But hold on, I've got a few more tricks that'll take this to another level…
Insider Tricks for Flawless Results
The Temperature Rule Nobody Follows
Many bakers think 350°F is safe for all cookies, but the trick to a perfectly crisp edge and tender center lies in a slightly lower temperature—around 325°F. Baking at this temperature allows the cookies to rise slowly, ensuring the interior stays moist while the exterior crisps up. I once baked at 350°F and the cookies were over‑baked on the edges; switching to 325°F saved the day and gave me a flawless batch.
Why Your Nose Knows Best
Before you pull the cookies out of the oven, trust your nose. A subtle, sweet aroma indicates the sugar is caramelizing, while a sharp lemon scent shows the zest is shining. If the smell feels flat, give them a minute more; if it’s too strong, pull them out immediately to prevent burning.
The 5‑Minute Rest That Changes Everything
Letting the cookies rest on the baking sheet for 5 minutes before transferring to a rack is more than a courtesy. This rest period allows the structure to set, preventing cracks and ensuring a uniform crumb. I’ve found that skipping this step often results in cookies that crumble when you pick them up.
Use a Cooling Rack
A wire rack lets air circulate around the cookies, keeping the bottoms from becoming soggy. If you don’t have a rack, use a piece of parchment on a metal tray; it’s a quick fix that still works well.
Freeze for Freshness
Once baked, wrap the cookies individually in wax paper and store them in a freezer-safe bag. When you’re ready to enjoy, let them sit at room temperature for 10 minutes—this restores their crispness without drying them out.
Watch the Sugar Ratio
The amount of powdered sugar you use for coating can be adjusted. Too much sugar will make the cookies overly sweet; too little will reduce the crinkle effect. A 1:1 ratio of powdered sugar to flour works well for a balanced finish.
Creative Twists and Variations
This recipe is a playground. Here are some of my favorite ways to switch things up:
Chocolate‑Lemon Crinkle
Fold ¼ cup of dark chocolate chips into the dough before baking. The chocolate adds a rich, bittersweet contrast that balances the citrus tang. The result is a cookie that feels like dessert and snack rolled into one.
Orange‑Zest Crinkle
Replace the lemon zest with an equal amount of orange zest for a sweeter, sweeter citrus profile. The orange’s natural oils give a fragrant, bright finish that’s perfect for a springtime treat.
Almond‑Flour Crinkle
Substitute half of the all‑purpose flour with almond flour for a nutty flavor and a slightly denser crumb. This variation is great for those who love a subtle almond undertone and a gluten‑free option.
Rosemary‑Infused Crinkle
Add 1 teaspoon of finely chopped fresh rosemary to the dough. The herb’s earthy aroma pairs unexpectedly well with lemon, creating a sophisticated flavor profile that’s ideal for a brunch gathering.
Spiced Crinkle
Stir in ¼ teaspoon of ground cinnamon and a pinch of nutmeg before baking. The warm spices add depth and make the cookies feel cozy and comforting—perfect for a rainy day.
Gluten‑Free Crinkle
Use a gluten‑free all‑purpose blend in place of the regular flour. Keep the leavening agents the same, and you’ll end up with a chewy, buttery cookie that’s safe for gluten‑sensitive diners.
Storing and Bringing It Back to Life
Fridge Storage
Store cooled cookies in an airtight container at room temperature for up to 5 days. If you notice the cookies have become slightly soft, place a slice of bread in the container; the bread will absorb moisture, keeping the cookies crisp.
Freezer Friendly
Wrap each cookie individually in parchment paper and then place them in a freezer‑safe zip‑lock bag. They can stay in the freezer for up to 3 months. When ready to eat, let them thaw at room temperature for 15 minutes before serving.
Best Reheating Method
To revive frozen or stale cookies, preheat your oven to 300°F (150°C). Place the cookies on a baking sheet and heat for 5 minutes. For extra crispness, sprinkle a light dusting of powdered sugar before reheating. A tiny splash of water in the bottom of the pan creates steam, keeping the cookies soft inside while the edges crisp up.