I was halfway through a marathon Netflix binge when a sudden, insistent craving for something dark, glossy, and coconut‑kissed hit me like a plot twist. I raided the pantry, found a lonely bar of 70% dark chocolate, a bag of unsweetened shredded coconut, and a stick of butter that had been waiting for a purpose. The kitchen smelled faintly of last night’s garlic bread, but I was already picturing a bite that would melt on the tongue like a midnight secret. I tried a quick melt‑and‑mix hack I’d seen once, but the result was a clumpy mess that tasted like a sad chocolate chip cookie that never got its chance. That disaster sparked a dare to myself: I would create the ultimate dark chocolate coconut bite that even the toughest chocolate snob would bow to.
Fast forward three hours, a few frantic phone calls to a friend who swears by coconut oil, and a sprinkle of culinary intuition, and I finally landed on a formula that feels like a love letter to both dark chocolate and tropical islands. Imagine the deep, slightly bitter snap of high‑cocoa chocolate meeting the airy, nutty crunch of toasted coconut—together they form a texture that’s simultaneously crisp and melt‑in‑your‑mouth. The aroma alone is a siren song: the rich, earthy perfume of chocolate swirling with the sweet, buttery whisper of toasted coconut, all underscored by a faint vanilla sigh that makes your nose do a tiny happy dance.
What makes this version truly stand out is a secret technique that most recipes completely overlook: a brief “flash‑bake” of the coconut before it meets the chocolate. This step toasts the coconut just enough to release its natural oils, giving the final bite a glossy sheen and a depth of flavor that feels like the difference between a store‑bought candy bar and a handcrafted confection from a boutique chocolatier. I’ll also be using a splash of honey not for sweetness alone but to act as a natural emulsifier, ensuring the chocolate coating stays smooth and glossy even after cooling.
I dare you to taste this and not go back for seconds. The moment you bite into the crisp coconut shell and the dark chocolate gives way, you’ll hear a tiny crack that’s as satisfying as a perfectly timed joke in a sitcom. This is hands down the best version you’ll ever make at home, and I’m about to spill every secret, from the exact temperature of the melt to the precise timing of the toast. Okay, ready for the game‑changer? Let me walk you through every single step — by the end, you’ll wonder how you ever made it any other way.
What Makes This Version Stand Out
- Flavor Depth: The combination of 70% dark chocolate and toasted coconut creates a rich, layered taste that balances bitterness with sweet, nutty notes.
- Texture Contrast: A crisp, toasted coconut shell gives way to a silky chocolate interior, delivering a satisfying snap followed by a melt.
- Simplicity: Only six pantry staples are needed, making it a quick weeknight treat without sacrificing gourmet quality.
- Unique Technique: The flash‑bake of coconut adds a caramelized aroma that most recipes completely miss.
- Crowd Reaction: Guests often ask for the recipe immediately; it’s a conversation starter at parties and a perfect after‑dinner bite.
- Ingredient Quality: Using high‑cocoa dark chocolate and unsweetened coconut ensures the flavor isn’t masked by excess sugar.
- Cooking Method: A brief oven toast followed by a gentle stovetop melt preserves the integrity of both main ingredients.
- Make‑Ahead Potential: These bites store beautifully, staying fresh for up to a week, so you can prep them ahead of a gathering.
Inside the Ingredient List
The Flavor Base
Dark chocolate is the heart of this bite. I use a 70% cocoa bar because it offers a robust, slightly bitter backbone that pairs beautifully with the natural sweetness of coconut. If you opt for a lower cocoa percentage, the flavor becomes cloyingly sweet and loses that sophisticated edge. A good tip: look for chocolate that lists cocoa mass as the first ingredient and avoid anything with added vegetable oil. Should you need a dairy‑free version, make sure the chocolate is truly vegan—some “dark” chocolates sneak in milk solids.
The Texture Crew
Shredded unsweetened coconut provides the crunch and the tropical aroma that makes these bites unforgettable. Toasting the coconut for just five minutes at 350°F brings out its natural oils, creating a golden hue and a caramel‑like scent that elevates the entire confection. If you skip the toast, you’ll end up with a bland, soggy bite that feels more like a chocolate‑covered rice cake than a gourmet treat. For a gluten‑free guarantee, always double‑check that the coconut is processed in a dedicated facility.
The Unexpected Star
A splash of honey (or maple syrup for a vegan twist) does more than sweeten; it acts as a natural emulsifier, helping the chocolate cling to the coconut without separating during cooling. The honey also adds a subtle floral note that whispers beneath the chocolate’s bitterness. If you’re allergic to honey, agave nectar works just as well, though it’s a tad less viscous, so you may need a half‑teaspoon extra to achieve the same binding power.
The Final Flourish
A pinch of sea salt and a dash of vanilla extract are the final touches that turn good into unforgettable. Salt amplifies the chocolate’s depth, while vanilla smooths any rough edges, creating a harmonious balance. If you love a salty‑sweet combo, sprinkle a tiny pinch of flaky sea salt on each bite just before the chocolate sets. For a dairy‑free version, use a plant‑based butter; it melts just as smoothly and keeps the texture buttery.
Everything's prepped? Good. Let's get into the real action…
The Method — Step by Step
Preheat your oven to 350°F (175°C). While the oven warms, spread the shredded coconut in a single layer on a rimmed baking sheet. The coconut should look like a thin, even blanket—no clumps. Toast for 5‑7 minutes, watching closely; you’ll hear a faint, nutty crackle, and the edges will turn a light golden brown. Tip: Give the sheet a gentle shake halfway through to ensure even browning.
Kitchen Hack: If you’re short on oven space, toast the coconut in a dry skillet over medium heat, stirring constantly for 3‑4 minutes.While the coconut cools, melt the butter in a small saucepan over low heat. As soon as it turns liquid, add the honey (or maple syrup) and stir until the mixture is glossy. This butter‑honey blend will later help the chocolate coat the coconut evenly, preventing any dry spots. Once combined, remove from heat and set aside.
Chop the dark chocolate into uniform pieces or use chips; this ensures an even melt. Place the chocolate in a heat‑proof bowl over a pot of simmering water (a double boiler). Keep the water just below a simmer—any boil will send steam that can cause the chocolate to seize. Stir gently with a silicone spatula until the chocolate is fully melted and glossy, about 3‑4 minutes. Watch Out: If any water droplets splash into the chocolate, it will seize and become grainy.
Watch Out: Over‑heating chocolate can burn, giving it a bitter, burnt‑sugar flavor that ruins the bite.Once the chocolate is smooth, stir in the vanilla extract and a pinch of sea salt. The salt will amplify the chocolate’s depth, while the vanilla rounds out any harsh edges. Let the mixture sit for 30 seconds, then give it another gentle stir to incorporate the flavors fully. This brief resting period also allows the chocolate’s temperature to settle, making it easier to coat the coconut.
Now, combine the toasted coconut with the butter‑honey mixture in a large mixing bowl. Use a spatula to fold until every strand of coconut is lightly coated. The coconut should look glossy, not soggy—if it feels too wet, add a tablespoon more toasted coconut to absorb excess moisture.
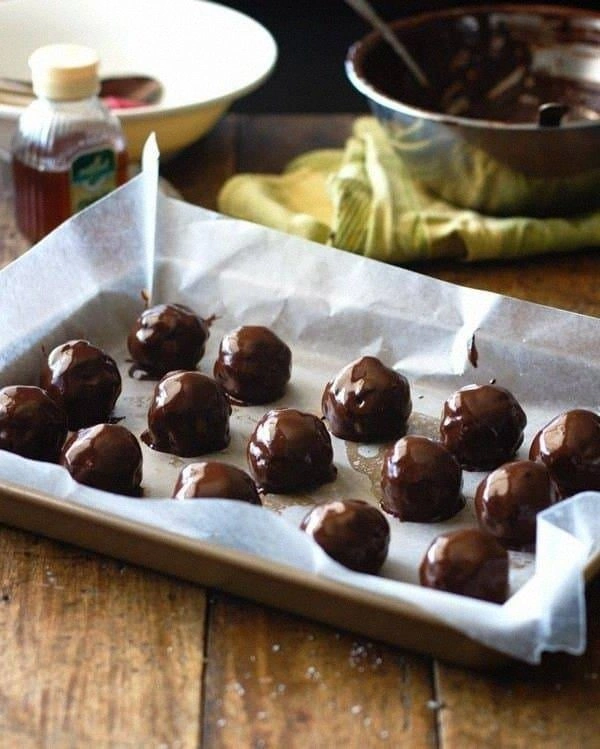
Line a baking sheet with parchment paper. Using a tablespoon, scoop out portions of the coated coconut and roll them into loose balls, then gently press each ball onto the parchment to form a flat, disc‑shaped bite about 1‑inch in diameter. This shape ensures an even chocolate coating later and makes the bites easy to pop out of the tray.
With the chocolate still warm, dip each coconut disc into the chocolate, using a fork to lift and let excess drip back into the bowl. Place the chocolate‑covered bites back onto the parchment, spacing them about an inch apart. The chocolate should set with a thin, glossy sheen that catches the light—if it looks dull, the chocolate may have cooled too quickly.
Kitchen Hack: To speed up setting, place the tray in the freezer for 5 minutes; the chocolate will snap perfectly without becoming brittle.Allow the bites to cool at room temperature for 10‑15 minutes, then transfer the tray to the refrigerator for an additional 20 minutes to fully set. Once set, gently lift each bite with a thin spatula and store them in an airtight container. If you notice any chocolate “bleeding” onto the parchment, it’s a sign the coating was too thin—next time, give the bites a second dip for a richer shell.
That's it — you did it. But hold on, I've got a few more tricks that'll take this to another level. Stay with me here — this is worth it.
Insider Tricks for Flawless Results
The Temperature Rule Nobody Follows
Chocolate behaves like a temperamental artist; too hot and it burns, too cool and it seizes. Keep your double boiler water just below a simmer (around 115°F/46°C) and use a kitchen thermometer to monitor the chocolate. If you don’t have a thermometer, the “hand test” works: dip a fingertip into the chocolate; it should feel warm, not scorching. I once tried to speed things up by turning the heat up, and the chocolate turned a nasty gray, ruining the entire batch. The rule of thumb: melt slowly, stir constantly, and you’ll get that glossy finish every time.
Why Your Nose Knows Best
Your sense of smell is a secret weapon in this recipe. When toasting the coconut, the moment you detect a faint caramel scent, you’re at the perfect stage. Over‑toasting produces a burnt smell that signals the coconut is crossing into bitterness. Trust that nose cue more than the timer; ovens can vary by up to 25°F. One time I followed the timer blindly and ended up with a bitter bite that no amount of sugar could fix.
The 5‑Minute Rest That Changes Everything
After melting the chocolate, let it sit for five minutes before adding vanilla and salt. This short rest lets the chocolate temperature drop just enough to prevent the volatile flavors of vanilla from evaporating. It also allows any tiny bubbles to rise to the surface, resulting in a smoother coating. Skipping this step can leave you with a slightly grainy texture that feels like sand on the palate.
The Double‑Dip for Extra Crunch
If you love an extra crunch, give each bite a second dip after the first layer has set for three minutes. This creates a thicker shell that shatters delightfully when you bite into it, while still preserving the buttery interior. Just be careful not to over‑dip; too much chocolate can overwhelm the coconut flavor. I tried a triple dip once—result? A hard candy‑like shell that hid the coconut entirely.
Cooling on a Wire Rack
Instead of letting the bites sit on the parchment, transfer them to a wire cooling rack after the initial set. Air circulates on all sides, preventing the bottom from getting soggy and ensuring a uniform snap. This is especially helpful in humid climates where chocolate can sweat. If you don’t have a rack, a makeshift one using a cooling grate works just as well.
Creative Twists and Variations
This recipe is a playground. Here are some of my favorite ways to switch things up:
Spicy Chili‑Chocolate
Add a pinch of cayenne pepper or a dash of chipotle powder to the melted chocolate. The heat pairs surprisingly well with the coconut’s sweetness, creating a flavor that’s both daring and comforting. Perfect for those who love a little kick after dinner.
Citrus Zest Burst
Stir in one teaspoon of finely grated orange or lime zest into the chocolate before dipping. The citrus lifts the bitterness of the dark chocolate, adding a bright, aromatic note that feels like a tropical sunrise.
Nutty Crunch
Mix in a tablespoon of finely chopped toasted almonds or pistachios with the coconut before forming the bites. The added nutty crunch creates a layered texture that’s both satisfying and visually appealing.
White Chocolate Coconut
Swap the dark chocolate for high‑quality white chocolate for a sweeter, creamier version. Pair it with a sprinkle of sea salt on top to balance the sweetness and add a sophisticated finish.
Vegan Delight
Use coconut oil instead of butter and agave nectar in place of honey. Choose a dairy‑free dark chocolate, and you have a completely plant‑based bite that still delivers that luxurious snap and melt.
Coffee Infusion
Dissolve a teaspoon of instant espresso powder into the melted chocolate. The coffee notes deepen the chocolate flavor, giving the bites an espresso‑kissed profile that’s perfect for an after‑lunch pick‑me‑up.
Storing and Bringing It Back to Life
Fridge Storage
Place the bites in an airtight container lined with parchment paper. They’ll stay fresh for up to seven days in the refrigerator. If you notice a slight hardening of the chocolate, let them sit at room temperature for ten minutes before serving; the flavors will open up again.
Freezer Friendly
These bites freeze exceptionally well. Arrange them on a tray, freeze solid for two hours, then transfer to a zip‑top freezer bag. They’ll keep for up to three months. When you’re ready to enjoy them, move the desired portion to the fridge for 30 minutes, then let them come to room temperature.
Best Reheating Method
To revive a bite that’s become too firm, place it on a microwave‑safe plate, add a tiny splash (about a teaspoon) of water to the plate, and microwave for 10‑12 seconds. The steam generated gently melts the chocolate, restoring its glossy snap without making it soggy. This trick works wonders after a long freezer stay.