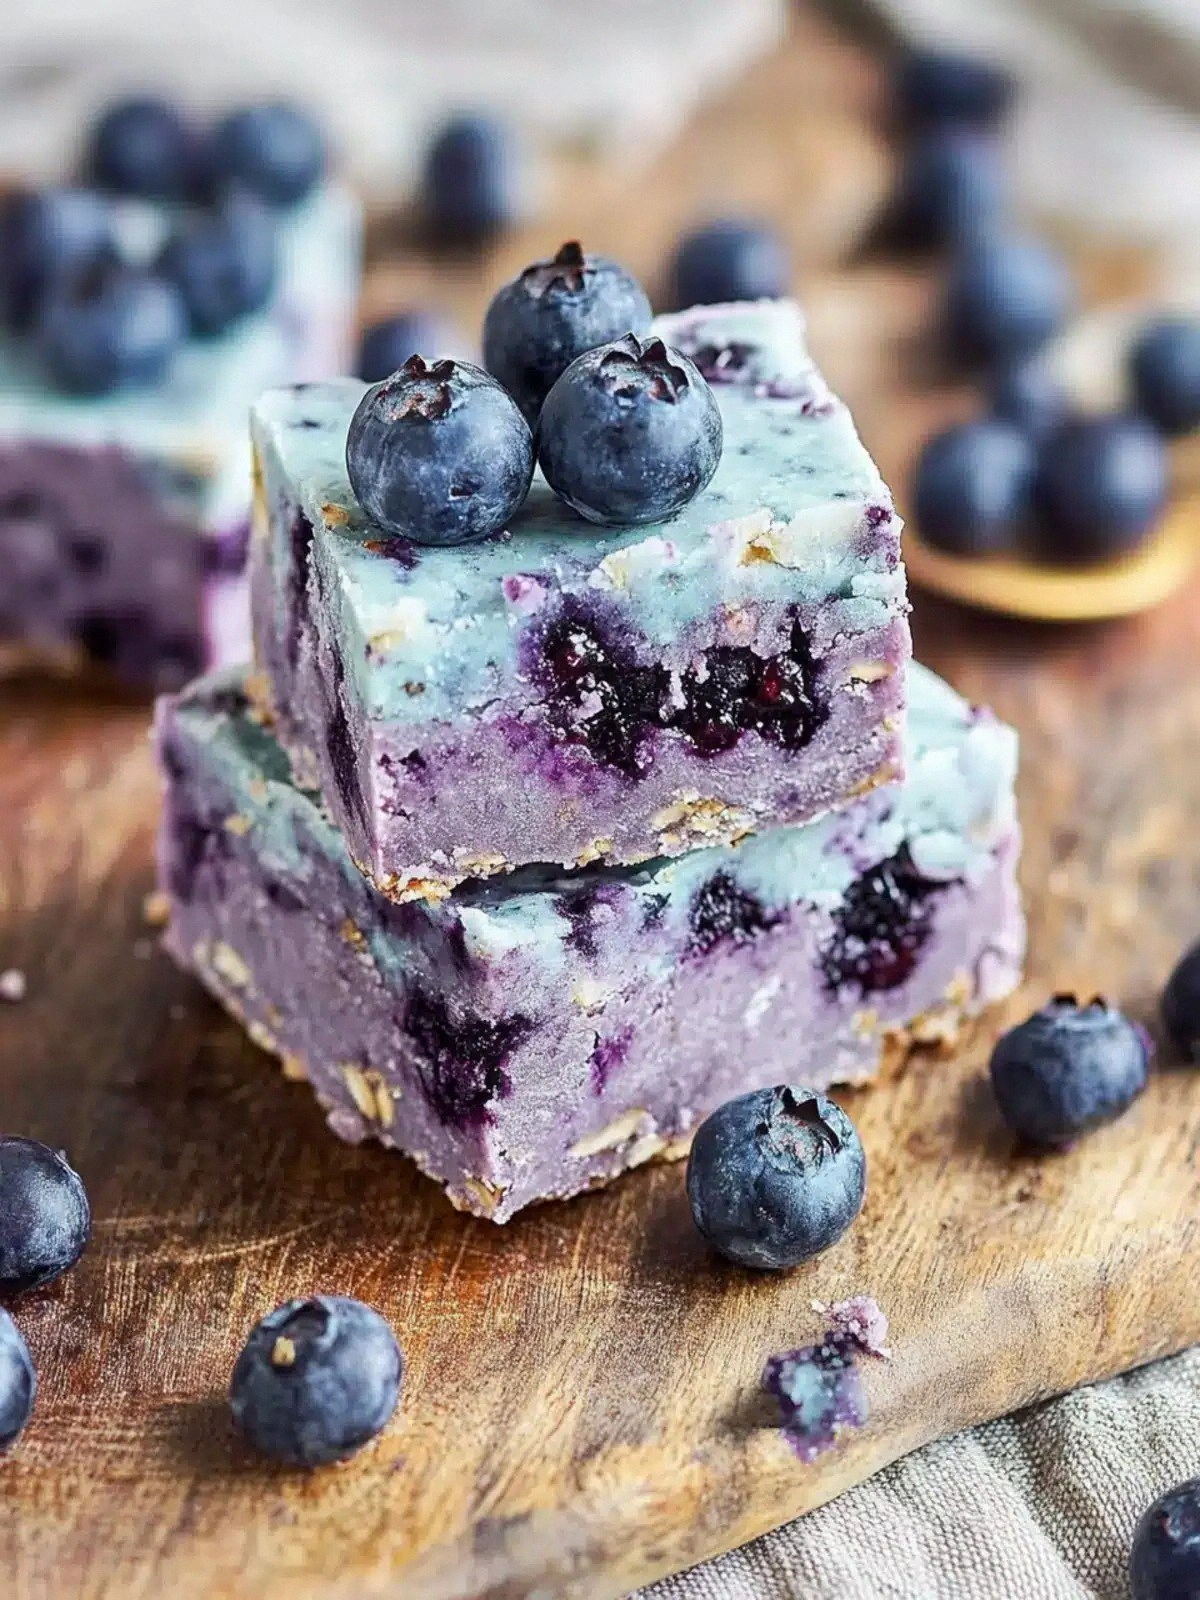
Ever find yourself staring at a bowl of flour, sugar, and blueberries, wondering how to turn a simple batter into a show‑stopping dessert? That was me last Friday, standing in the kitchen with a half‑finished blueberry muffin batter that looked more like a sticky mess than a treat. I reached for the pantry, grabbed a can of Eagle‑Brand milk, a block of white chocolate, and a rainbow of food coloring, and I decided to throw caution to the wind. The result? A blueberry muffin fudge that Wi—yes, Wi, like “wow” but with a twist—bursting with flavor, color, and a texture that feels like a hug in a bowl.
Picture this: the kitchen is humming with the clink of metal, the air thick with the sweet scent of melted chocolate, and a faint blueberry perfume drifting from the pan. The sound of the whisk is a steady metronome, the heat from the oven radiating like a gentle sun. As I pour the batter, the blueberries pop and fizz, releasing their juices like tiny fireworks. The batter thickens, turning from a liquid to a silky, glossy batter that glistens under the kitchen lights. It’s a sensory symphony that makes your taste buds tingle even before the first bite.
Now, let’s address the elephant in the room: why is this version the best? The secret is in the layers of flavor and the playful use of color. Each component is carefully chosen to complement the others—soft blueberries, a creamy milk base, velvety white chocolate, and a hint of honey for depth. The blue and purple food colorings create a visual spectacle that turns an ordinary muffin into a piece of edible art. And the texture? Think of a chewy, chocolatey fudge that melts in your mouth while the blueberries burst with juice. It’s a dessert that’s as beautiful to look at as it is delicious.
I dare you to taste this and not go back for seconds. That’s not hyperbole; it’s a promise. Picture yourself pulling this out of the oven, the whole kitchen smelling incredible, and the first bite sending a wave of chocolatey blueberry bliss through your senses. You’ll see why this is hands down the best version you'll ever make at home. If you’ve ever struggled with blueberry muffins that turn out dry or fudgy, you’re not alone—and I’ve got the fix. Stay with me here—this is worth it.
Let me walk you through every single step—by the end, you'll wonder how you ever made it any other way. From the moment you preheat the oven to the final drizzle of melted chocolate, each step is designed to maximize flavor, texture, and visual appeal. I’ll share the exact measurements, timing, and even the small tricks that elevate this recipe from good to unforgettable. Ready? Let’s dive in.
What Makes This Version Stand Out
- Flavor: The combination of sweet blueberries, rich white chocolate, and a subtle honey undertone creates a layered taste experience that’s both familiar and novel.
- Texture: The batter’s density gives it a fudgy center, while the blueberries stay plump, providing a delightful contrast between chewy and juicy.
- Color: The blue and purple food colorings produce a striking visual effect that turns each muffin into a work of art.
- Ease: Every ingredient is pantry‑friendly, and the method requires minimal equipment—just a whisk, a mixing bowl, and a baking sheet.
- Make‑ahead: The batter can be prepared a day in advance and frozen; just thaw and bake for a quick dessert.
- Versatility: Swap the blueberries for raspberries or add nuts for extra crunch—this recipe adapts to your cravings.
Alright, let's break down exactly what goes into this masterpiece…
Inside the Ingredient List
The Flavor Base
At the heart of this recipe is the classic muffin batter—flour, sugar, salt, and a generous splash of milk. The flour provides structure, while the sugar sweetens and the salt balances the flavors. If you omit the salt, the batter becomes cloyingly sweet, and the blueberries lose their bright burst of flavor.
Using whole‑milk or a low‑fat alternative doesn’t significantly alter the outcome; the key is to keep the milk at room temperature to ensure a smooth batter. A common swap is to use oat milk for a dairy‑free version, but the batter may be slightly thinner. For the best results, let the milk sit out for 10 minutes before mixing.
The milk also acts as a carrier for the white chocolate, allowing it to melt evenly into the batter. If you’re using a powdered milk alternative, whisk until fully dissolved to avoid lumps. Remember, the goal is a silky, uniform mixture that coats every blueberry.
The Texture Crew
The 0.5 cup butter is the unsung hero that adds richness and helps create a tender crumb. Melt it gently to avoid scorching, then let it cool slightly before adding to the batter. If you’re looking for a vegan version, substitute with coconut oil or vegan butter, but note the flavor will shift slightly.
Oatmeal is the secret to a slightly chewy bite that contrasts with the soft muffin body. It also adds a subtle nutty flavor that pairs well with the blueberries. If you prefer a gluten‑free option, use gluten‑free oats and a gluten‑free flour blend. This tweak keeps the texture intact while making the recipe inclusive.
Brown sugar, at 0.5 cup, introduces caramel undertones that deepen the overall flavor profile. It also reacts with the vanilla to create a complex aroma. If you’re watching your sugar intake, you can reduce it by ¼ cup; the muffins will still be delicious but slightly less sweet.
The Unexpected Star
White chocolate is the star that ties everything together. At 2 cups, it melts into the batter, creating a glossy, chocolatey coating. The high cocoa butter content ensures a smooth melt and a silky mouthfeel.
If you’re a chocolate purist, try using a mix of white and milk chocolate for a richer flavor. Just remember that milk chocolate has a lower cocoa butter ratio, so you may need to add a teaspoon of butter to maintain consistency.
The blue and purple food colorings are not just for show—they help to create a visual experience that enhances the taste. A few drops are enough to achieve a vibrant hue without masking the natural blueberry color. If you’re concerned about artificial dyes, look for natural food colorings derived from spirulina or beetroot.
The Final Flourish
Honey, at one tablespoon, adds a subtle floral sweetness that balances the chocolate and blueberries. It also contributes a slight viscosity, helping the batter set slightly faster. If you prefer a more pronounced honey flavor, increase the amount to two tablespoons.
Vanilla extract, at one teaspoon, is the final aromatic layer that ties all the flavors together. It enhances the sweetness and brings a warm depth that lingers on the palate. For a more pronounced vanilla note, consider using vanilla bean paste.
The 1 cup blueberries are the star fruit that provides bursts of juice with every bite. Choose fresh, firm berries for maximum flavor; frozen blueberries work too, but thaw them first to avoid excess moisture. If you’re using dried blueberries, rehydrate them in warm water before adding to the batter.
Everything's prepped? Good. Let's get into the real action…
Baking Science
The science behind this recipe is surprisingly simple yet elegant. The gluten in the flour forms a network that traps air bubbles, giving the muffins a light rise. When the batter is poured into the pan, the heat causes the butter and white chocolate to melt, creating steam that expands the batter further.
The sugar not only sweetens but also lowers the water activity in the batter, which helps the muffins hold their shape during baking. The blueberries release pectin when heated, which thickens the batter slightly and adds natural sweetness. If you bake too long, the pectin can over‑set, resulting in a gummy texture.
The temperature of the oven is crucial. Baking at 350°F (175°C) allows the muffins to rise slowly, ensuring a tender crumb. If you crank the heat up to 400°F, the muffins may brown too quickly on the outside while remaining under‑baked inside.
White chocolate’s high cocoa butter content means it melts at a lower temperature than milk chocolate. This ensures it distributes evenly throughout the batter without forming clumps. If you use dark chocolate, remember it has more cocoa solids and less butter, so you’ll need to adjust the butter ratio.
The final step—drizzling melted chocolate over the cooled muffins—creates a glossy finish that seals the surface and locks in moisture. The chocolate also adds a slight crunch when bitten into, providing a satisfying contrast to the soft interior.
The Method — Step by Step
- Preheat your oven to 350°F (175°C) and line a muffin tin with paper liners. The oven temperature is critical; too hot and the muffins will burn on the outside while staying raw inside. As the oven heats, the air inside will start to expand, setting the stage for a perfect rise. Keep a close eye on the temperature with an oven thermometer if you’re a perfectionist.
- In a large mixing bowl, whisk together 1 cup of flour, 1 cup of sugar, 0.5 cup of brown sugar, 1 tsp of salt, and 1 tsp of vanilla extract until fully blended. This dry mix forms the backbone of the batter. Whisking ensures even distribution of the salt and vanilla, preventing any pockets of uneven flavor. The more you whisk, the smoother the batter will be.
- Melt 0.5 cup of butter in a small saucepan over low heat until it’s liquid but not browned. Pour the melted butter into the dry mix, stirring until a crumbly mixture forms. The butter adds richness and helps bind the dry ingredients together. Make sure the butter isn’t too hot, or it could scramble the eggs if you add them later.
- Add 1 can of Eagle‑Brand milk and whisk until the mixture is smooth. The milk hydrates the flour and creates a batter that’s thick enough to hold the blueberries. If the batter feels too thick, add a splash of milk to reach the desired consistency. The milk also helps the white chocolate melt evenly.
- Fold in 1 cup of blueberries gently, being careful not to break them apart. The blueberries should remain whole to provide juicy bursts when you bite into the muffin. If you prefer a smoother texture, mash a few berries before adding them. The blueberries also add a natural sweetness that balances the chocolate.
- Pour the batter into the prepared muffin tin, filling each cup about ¾ full. The ¾ fill ensures the muffins rise without overflowing. Gently tap the tin on the counter to release any air pockets. The batter should spread slightly but not spread too thin; this will give the muffins a dense, fudgy interior.
- Bake for 20–25 minutes, or until a toothpick inserted into the center comes out clean. The muffins should have a golden‑brown top with a slightly shiny glaze. The baking time may vary depending on your oven, so start checking at 18 minutes. If the tops brown too quickly, tent the muffins with foil.
- While the muffins bake, melt 2 cups of white chocolate in a heat‑proof bowl over a pot of simmering water. Stir occasionally until smooth. This melted chocolate will be used to drizzle over the cooled muffins, giving them a glossy finish. The key is to keep the chocolate at a low temperature to avoid scorching.
- Once the muffins are done, remove them from the oven and let them cool in the tin for 5 minutes before transferring to a wire rack. This allows the structure to set, preventing them from breaking apart. While they’re still warm, drizzle the melted chocolate over the tops, letting it pool slightly for an indulgent look.
That's it — you did it. But hold on, I've got a few more tricks that'll take this to another level…
Insider Tricks for Flawless Results
The Temperature Rule Nobody Follows
Many bakers think 375°F is the sweet spot, but 350°F is actually the sweet spot for this recipe. The lower temperature allows the muffins to bake evenly without burning on the edges. If your oven runs hot, use a thermometer to double‑check. I once baked at 375°F and the muffins were too dry; the next time I lowered it, the texture was perfect.
Why Your Nose Knows Best
The first aroma you smell should be a sweet, buttery scent. If you notice a faint metallic or burnt smell, it means the butter is over‑heated. The aroma of fresh blueberries is a good sign that they’re still intact. Trust your nose—it’s the best judge of freshness.
The 5‑Minute Rest That Changes Everything
After removing the muffins from the oven, let them rest on the rack for exactly five minutes. This pause allows the steam to redistribute, ensuring the interior finishes baking without over‑drying. The muffins will still be hot, but they’ll be easier to handle. Skipping this step can lead to muffins that crumble when you try to lift them.
Mixing the Chocolate at the Right Time
Do not pre‑melt the white chocolate before baking. The chocolate should only be melted after the muffins are out of the oven. If you melt it too early, it can cool and harden, making it difficult to drizzle. A quick melt in a microwave works, but always stir to avoid hot spots.
Adding a Touch of Citrus
A few drops of lemon zest can brighten the blueberry flavor and add a subtle zing. Sprinkle the zest over the batter before baking. The citrus oils complement the chocolate and create a more complex flavor profile. If you’re sensitive to citrus, use only 1/4 teaspoon.
Storing the Leftovers
Wrap each muffin tightly in plastic wrap and store at room temperature for up to three days. For longer storage, place them in an airtight container in the fridge. If you want to freeze them, wrap them individually and place them in a freezer bag; thaw in the fridge overnight. The muffins stay fresh and delicious for weeks.
Creative Twists and Variations
This recipe is a playground. Here are some of my favorite ways to switch things up:
Raspberry Swirl
Swap the blueberries for fresh raspberries and add a swirl of raspberry jam before baking. The jam adds a sweet glaze that complements the tart berries. It also creates a beautiful marbled effect when the muffins bake.
Nutty Crunch
Fold in ½ cup of chopped pecans or walnuts for a crunchy texture. The nuts pair well with the chocolate, creating a nutty undertone. Toast the nuts lightly before adding to keep their flavor bright.
Almond Joy
Replace the white chocolate with a mix of white chocolate and almond butter. The almond butter adds a creamy texture and nutty flavor. Drizzle extra almond butter over the top after baking for an extra indulgent touch.
Chocolate‑Berry Explosion
Use a mix of blueberries, strawberries, and blackberries for a rainbow of flavors. The different berries provide varying levels of sweetness and acidity. This variation is perfect for summer gatherings.
Vegan Delight
Use plant‑based milk, vegan butter, and a vegan chocolate substitute. Replace honey with maple syrup. This version is completely dairy‑free while still delivering that fudgy, chocolatey goodness.
Low‑Sugar Option
Reduce the sugar by ¼ cup and replace with a sugar substitute like stevia or erythritol. The muffins will still rise and taste sweet, but with fewer calories. Be sure to adjust the baking time slightly, as sugar also helps with browning.
Storing and Bringing It Back to Life
Fridge Storage
Store muffins in an airtight container at room temperature for up to three days. For longer freshness, keep them in the fridge for up to a week. The muffins will stay moist and flavorful, but be sure to let them come to room temperature before eating.
Freezer Friendly
Wrap each muffin individually in parchment paper, then place them in a freezer bag. They can be frozen for up to three months. To thaw, leave them at room temperature for 30 minutes or microwave on low power for 10–15 seconds.
Best Reheating Method
Reheat frozen muffins in the oven at 350°F (175°C) for 8–10 minutes. Add a splash of water to the baking dish to create steam, which keeps the muffins from drying out. If reheating fresh muffins, a quick 30‑second microwave boost is enough.